Camera settings, part 3: Aperture in wildlife photography

After writing about the importance of ISO and shutter speed, we finally arrived to the third pillar of settings, which is the aperture! With this three article, we should understand the relation of this three settings, and how they are working!
THE RELATION BETWEEN ISO, SHUTTER SPEED AND APERTURE
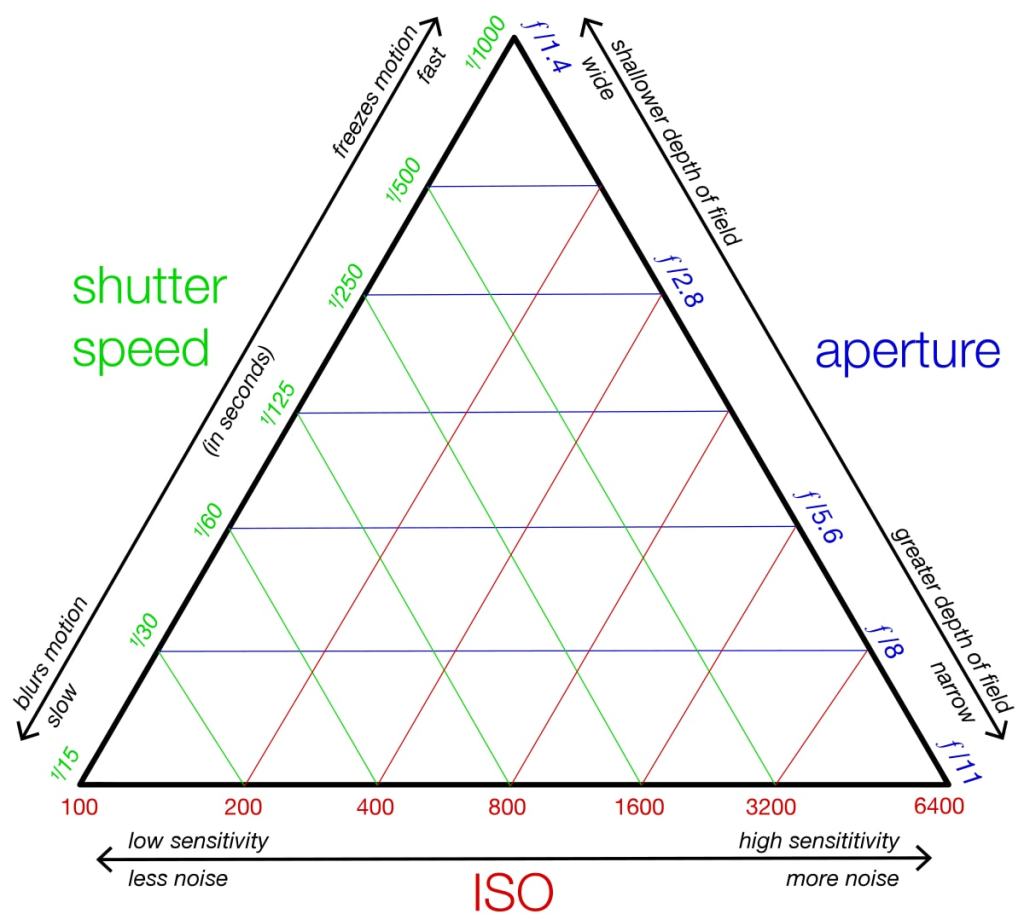
The triangle

WHAT IS APERTURE?

Aperture is the setting, which controls, how much your camera lens is opened or closed. It is either widen the opening or narrow it down, depends on the value of the aperture!

As a result, you will be able to actually control with this that, how much light can enter into your camera. With the Aperture Priority mode on your camera, you can adjust this manually!


THE VALUES OF APERTURE

The value is given with f-numbers, like f/2, f/4 and so on. Between the numbers and the state of the opening has an inverse relation, it means, that as we increase the f-number, the opening will narrow down.

Usually the maximum aperture is f/1.4(widest opening), and the minimum is f/22(smallest opening or most narrow).


WHAT IS THE INFLUENCE OF APERTURE ON YOUR FINAL IMAGE?

A higher aperture(smaller opening) will result a larger depth of field(larger area of focus), till the smaller aperture will result a smaller depth of field.

WHAT IS DEPTH OF FIELD?

To be completely honest, when I studied aperture, it wasn’t that straightforward for me, what is exactly depth of field. In case someone else is struggling with it also, I will try to explain it as simple as I can!

Depth of field refers to the distance between the closest and the farthest objects in a photo that appears acceptably sharp. Generally, a large aperture results in a large amount of foreground and background blur, yielding shallow depth of field. On the other hand, a small aperture results in small amount of foreground and background blur, yielding wide depth of field.


CHOOSING THE “RIGHT” APERTURE FOR WILDLIFE PHOTOGRAPHY

There are a lot of opinions existing regarding the right aperture for wildlife photography, however, like a lot of other things in photography, it can be very subjective. I will try to give some basic guidelines here, but I encourage everybody to practice, and try out what is working for them and what is not.

Now, with fast-moving animals, in order to capture them properly with your camera, generally speaking you will need wider aperture. It can also provide a really diffused background!

What is often missed and overlooked about using a wide aperture though, is the issue of key elements of an animal’s body being out of focus due to the shallow depth of field.

To understand this, I will try to give you an example here. Imagine, we want to photograph a bird, for a portrait. We are focusing on the eyes, which will be really sharp, however the beak will be out of focus. It is because the depth of field is too small, therefore using a smaller aperture in this case would result a better image! With portraits, it is important, that the whole head is sharp, so choose the correct aperture setting carefully knowing this!

Also, keep in mind, that the closer your subject to the camera, the smaller the depth of field will be!

When we are preparing our camera settings, we should start from the widest aperture possible, and adjust from there, if we need for our wildlife photography!


WHEN WE SHOULD USE APERTURE PRIORITY MODE?

Now, generally speaking, the best time using aperture priority mode, if we one, not really familiar with our camera settings yet, or two, we are photographing in a really fast-changing environment, in terms of lighting!

Aperture priority is a good choice, when you are capturing birds flying around with your camera.


COMBINING THE THREE PILLAR SETTINGS TOGETHER

Now, lot of camera is coming with Auto Mode, where the camera will set up the ISO, shutter speed and the aperture automatically. In order to photograph wildlife on a higher level, we should know how to adjust these settings in relation with each other.

Whenever you press your shutter button, the light will enter into your camera, then it goes through the aperture hole. Once the light goes past the lens aperture, it then hits the shutter curtain, which is like a window that is closed at all times, but opens when needed. The shutter then opens in a matter of milliseconds, letting the light hit the camera sensor for a specified amount of time. Now, after this, the sensor gathers the light, and your ISO brightens the image if necessary (it will also result grainy and lower quality images sometimes, so be careful). Then the shutter closes and the light is completely blocked from reaching the camera sensor.

In bright conditions when lots of light can enter in the lens, with a very small lens aperture, we would need more time, i.e. longer shutter speed for the sensor to gather enough light to produce a properly exposed image.

What would happen if the lens aperture/hole was very big? Obviously, a lot more light would hit the sensor, so we would need a much shorter shutter speed for the image to get properly exposed.

These are just a few examples, obviously a lot more scenario exists, this is the beauty of wildlife photography! In nature, with many different environment and animals, we will find ourselves in so many different situations, we should make sure we are prepared and ready!


CONCLUSION

If you read the first and the second part, you should start to see the relations between the settings. With the guidelines I am sharing here and the necessary practice, we should be able to develop with our wildlife photography in a short period of time!

Just knowing this three settings will increase your chances for better images, mastering them is essential in order to become a good wildlife photographer. Obviously, on your journey, you will find your best settings, which works best for you and with you.

Experiment if you would like, feel free to try out different options, with keeping the basic knowledge in mind!

I hope I could help with this article, if you wanted to know more about aperture, or you are new in wildlife photography! Enjoy!

If you have some spare time, please check out my Youtube Channel: https://www.youtube.com/channel/UC6Vgiw_7TZrN7Lx2cFLA5eQ?view_as=subscriber

If you have some spare time, please check out my Instagram: https://www.instagram.com/wildlifeoftheplanetmpc/?hl=hu

Thank you!

Camera settings, part 2: Shutter speed in wildlife photography!

In the first part, I was writing about ISO, one of the pillar settings for photography. The second will be the shutter speed. I will try to share as much information as I can, and write as clear as I can, in order to be comprehensible!

Let’s start!


WHAT IS SHUTTER SPEED?

In every camera, in front of the sensor, you can find a shutter. When you take a photo, this shutter opens and closes to let light reach the sensor, creating your image. Shutter speed describes how quickly or slowly the shutter opens and closes again. A fast shutter speed means that the shutter is only open for a short period of time; a slow shutter speed means the shutter is open for longer.


THE VALUES OF SHUTTER SPEED

The measure for shutter speed is seconds, or the fraction of a second. For example 1/200 shutter speed will allow light to go into your camera for 0.02 second. With other words, the shutter will open for only 0.02 second for your photo.  This is also known as the exposure time, because it’s the amount of time the sensor is exposed to light.

Most of the modern cameras nowadays can handle 1/8000 shutter speed, or sometimes even more! On the other side of the measure, the longest shutter speed available on today’s cameras is 30 seconds!

LONG AND SHORT SHUTTER SPEED

Using a long shutter speed will result motion blur.  If your shutter speed is long, moving subjects in your photo will appear blurred along the direction of motion. This technique often used in the photography industry.

Using a fast shutter speed however will result a pin-sharp image(if other settings are correct). fast shutter speed will allow us to completely freeze the motion on the photo.

Fast shutter speed is usually used in bird photography, where capturing these animals in flying require more advanced settings.


AUTO SHUTTER SPEED OR MANUAL?

If we choose automatic shutter speed, sometimes it will result badly exposed and highly blurred images, so it is worth to learn how to use properly shutter speed manually.

This is particularly true when the camera is shaking a lot(hand-held for example).


CHOOSING THE “RIGHT” SHUTTER SPEED FOR WILDLIFE PHOTOGRAPHY

As I mentioned before, photographing moving objects require more advanced settings. Fortunately we have a chance sometimes to capture the subject animals when they are still, or moving slowly, but most of the time, they are moving quickly, flying, running and so on.

To prepare for that, we can choose fast shutter speed. There is not really a rule for exactly how fast, but generally speaking you want your shutter speed faster than 1/600, I would say!

Now, in order to be able to capture and freeze the moment properly, with the fast shutter speed we will need light. In a bright and sunny day, light won’t be a problem. ISO settings will come in the picture here, when you would like to photograph with fast shutter speed in low-light environment, and in this case you might need to adjust your ISO settings!

SHUTTER SPEED FOR BIRD PHOTOGRAPHY

Imagine a kingfisher coming out from the water, water drops are everywhere, really quick movements, the whole thing is happening in less than a second! Capturing these kind of moments requires a really really fast shutter speed, using 1/2000 or even higher shutter speed is not rare, and I would recommend to use the same with your photography, if you would like to take successful photos of rapidly-moving birds.

Always study and know, what will be your subject animal. Just to get the feeling of it, photographing hummingbirds may require shutter speed as fast as 1/8000, however a slowly moving ostrich in Africa will require “only” a 1/800 shutter speed setting for example!

It is always better to be prepared, than missing a unique moment, because of a low shutter speed!

BLURRING MOTION

Some people are like this technique, with this you can create unique photos. However, it’s a bit more challenging since slower speeds require more steady hands and in most cases a tripod to make sure the camera is perfectly still. For example, if you are shooting at ½ of a second, and the photographer moves the camera ever so slightly it will result in an entirely blurry photo.

Lot of landscape photographer using this technique in order to capture the views in a unique way, but keeping the “movement”on the photo with the motion blur technique(like a waterfall image for example).


CONCLUSION

Shutter speed, as a second pillar of the main camera settings, is probably one of the most important one! Knowing properly how to use it in wildlife photography, is essential, without it, you will never be able to photograph pin-sharp images!

Generally speaking, always try to use the highest shutter speed possible, because in wildlife photography, your subject animal will move fast, and quick, and won’t be easy to capture them properly with your camera!

I hope I could help with this article for beginner wildlife photographers, or for those who had some doubts about shutter speed and how it is exactly working!

If you have some spare time, please check out my Youtube Channel: https://www.youtube.com/channel/UC6Vgiw_7TZrN7Lx2cFLA5eQ?view_as=subscriber

If you have some spare time, please check out my Instagram: https://www.instagram.com/wildlifeoftheplanetmpc/?hl=hu

Thank you!
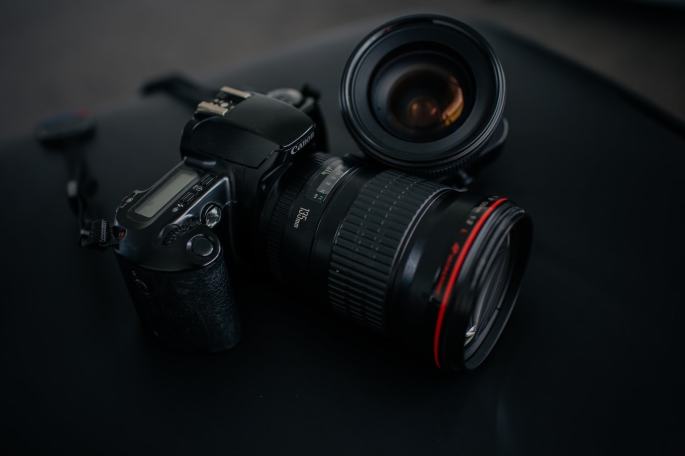
What is a telephoto lens? Do we need for wildlife photography?

WHAT IS A TELEPHOTO LENS?

The telephoto lens is a specific type of a long-focus lens in which the physical length of the lens is shorter than the focal length.

LONG-FOCUS LENS

Long-focus lens is a camera lens which has a focal length that is longer than the diagonal measure of the film or sensor that receives its image. It is used to make distant objects appear magnified with magnification increasing as longer focal length lenses are used.

FOCAL LENGTH

The focal length of an optical system is a measure of how strongly the system converges or diverges light; it is the inverse of the system’s optical power. A positive focal length indicates that a system converges light, while a negative focal length indicates that the system diverges light. A system with a shorter focal length bends the rays more sharply, bringing them to a focus in a shorter distance or diverging them more quickly. 


DO I NEED A TELEPHOTO LENS FOR WILDLIFE PHOTOGRAPHY?

To start wildlife photography, no you don’t need a telephoto lens. It is more important to learn the basics, how to handle your camera, settings, the subject animals behaviour, and other attributes. However, if you think about wildlife photography on a more serious level, you will need to start using a telephoto lens after a while.

Most photographers have zoom telephoto lenses in their kit bag, generally of the 70-300mm type or equivalent. These are a great starting point for shooting wildlife, but if you want to get serious about the subject, their relatively short reach can quickly become limiting.


WHY TELEPHOTO LENS HELP IN WILDLIFE PHOTOGRAPHY?

First of all, it will bring your desired animal closer to you, therefore your result can be better. If you develop getting closer to your subject, and using a telephoto lens at the same time, i bet you will start shooting great photos with your camera!

Thinking about distance, we have to mention here the safety. If we want to photograph dangerous animals like lions, bears or even large herbivorous mammals, like the elephant, we have to keep distance to stay safe! You can read more how to capture dangerous animals with your camera here!

Mainly when we are beginners in wildlife photography, and we need a lot of practice, visiting zoo or other animal parks is a great option for it. Now, obviously in these places between you and your subject will be fences, or at least glass windows. If you’re using a lens with a longer focal range, it can be quite easy to eliminate fences from shots. Similar results can be produced on lenses with wider apertures on offer, meaning users with lenses that have smaller focal lengths can still produce mesh-free images. Basically, you need to set a wide aperture, place the lens over one of the gaps and once there’s some distance between your subject and the fence, click the shutter button.


TIPS BEFORE YOU BUY TELEPHOTO LENS

Try to look for lenses with fast auto-focus.

Think about, what would you like to photograph, before you buy one telephoto lens. If you like to capture large mammals with your camera for example, 500 mm lens would be too long, but for bird photography, especially song birds, you can even consider 600 mm. It is up to your subject animal, really.

Obviously price can be a boundary, but NEVER buy a lens because it’s cheap. I would recommend to wait, till you can afford and buy a better telephoto lens!

If you will use your lens hand-held, you probably want to consider buying a light lens. Carrying a heavy lens, and photograph hand-held can be a pretty tiring experience for your arms!

Maximum aperture can be a con, if you are looking for telephoto lenses, try to choose one with a larger maximum aperture.


RECOMMENDED TELEPHOTO LENSES

Now, when I started wildlife photography, I had a really low budget, and my first telephoto lens was a used one. If you are in the same situation, I would recommend to check out KEH Camera, great second hand gears for good prices!

Shop KEH – the world’s largest pre-owned camera store!

AMAZON

If you can afford new gear, you can check out my recommended telephoto lenses here:

My recommended telephoto lenses

My very first lens was a Canon 400 mm f/5.6, I hugely recommend this if you are starting wildlife photography(especially bird photography) and consider buying one. Great lens to start with!


I hope I could help with this article for those, who wanted to know more about telephoto lenses, and thinking about buying one! Choose wisely and have fun with it!

If you have some spare time, please check out my Youtube Chnanel: https://www.youtube.com/channel/UC6Vgiw_7TZrN7Lx2cFLA5eQ?view_as=subscriber

If you have some spare time, please check out my Instagram: https://www.instagram.com/wildlifeoftheplanetmpc/?hl=hu

Thank you!

March Photo Challenge – WINNER

Second month is over, and i can gladly tell, that we got more submissions this time, than last month! It is a really good sign, and i hope we can keep the trend, and continue through the next month, because it will allow us to expand as a contest, and get involve more material regarding for prices!

This month’s topic was: CUTE MAMMALS

This month’s Winner is Corine Bliek, who sent us a wonderful capture of a little bunny!

Instagram: https://www.instagram.com/corinebliek/?hl=hu

As always, i made a full interview with the winner:


FULL INTERVIEW

1.When did you start photography? I have always been a birder and nature lover since I was very young. As I got older I wanted very much to capture the things I saw but always thought the equipment for bird photography was to expensive. Until recently, when I came across the so called super zoom or bridge camera.  So I started photography in january 2017 with a bridge camera, a Nikon P900. I got hooked straight away and in June 2018 I bought my SLR camera with big lens. 

2. What’s your name, how old are you and what do you do for living? My name is Corine Bliek, I am 60 years old and work fulltime as a curator in a museum for culture and science, the Museon in The Hague, Netherlands: www.museon.nl or instagram account museondenhaag. The collections I manage are the ethnographic and geological collections. The goal of our museum is to inspire people to discover the world and treat it with respect. I share the same goal with my pictures.

3. What was your best wildlife experience? My best wildlife experience is a difficult question. I have been on a dolphin trip in Portugal and that was really great, but last year I went on a trip at sea in Holland to see the Northern Gannets, birds I had on my wishlist for a long time. It was absolutely fantastic to see them flying above the boat.

4. What equipment do you use for photography? From off June 2018 I make all my pictures with a Nikon D7500 with a 200-500 mm Nikkor lens.

5. Best animal you did take photo of? I think the Eurasian dotterel was the best bird I ever photographed. They are rare visitors in Holland and are very tame. It is a wonderful experience to be so close to such beautiful birds! I have spend a few hours with them, just sitting next to them. 

6. Dream place to visit for photography? My dream place to be would be on the North Pole, to take pictures of the northern light!

7. Dream animal to take photo of? Bears and orka’s are dream animals for me to take pictures of. But as for birds my dream birds to take pictures of are owls, especially different types of northern owls and pygmee owls. 

8. What is your future plan with photographing? Since I still have a fulltime job which I very much enjoy, photography will stay a hobby for me. I hope to get out in the field as much as i can, and hopefully will make some bird photography trips abroad in the future. To be out in nature and look for birds and the right opportunity to take a picture is my main goal, it is a kind of mindfulness to me. 

Furthermore, I just made a website , https://corinebliek-birdphotography.myportfolio.com, which I hope will attract people from all over the world and inspire them to enjoy nature and see that you don’t have to go far to experience the beauty of birds. It would be wonderful when my pictures can contribute to the awareness of people of the beauty of nature. 


Our WINNER Corine with this adorable bunny capture:

The winner photo: Adorable bunny from Corine Bliek

The topic for April is: MYSTERIOUS REPTILES

I hope you like this topic as much as i do!

Check out how can you participate: https://www.youtube.com/channel/UC6Vgiw_7TZrN7Lx2cFLA5eQ?view_as=subscriber

If you have some spare time, please check out my instagram also, where i am also sharing the WINNER photos:

https://www.instagram.com/wildlifeoftheplanetmpc/?hl=hu

Thank you!

Where can i capture Wild Boars in the UK with my camera?

Before i share with you this, i would like to ask you, two things:

  • Be really careful, wild boar’s are protecting their territory, therefore they can become aggressive, always keep distance if you taking photos, or make sure, you are in a safe place
  • NEVER disturb wildlife, during your capturing session, always make sure avoiding any interfere with wildlife and the environment, i say this here, because whenever we are taking photos of Wild Boar babies for example, they are easily can get distracted by human, and we MUST avoid any connection with them!

SO WHERE WE CAN FIND THEM AFTER ALL IN THE UK?

There are several confirmed breeding populations of wild boar in the UK.

In England they are established on the Kent/East Sussex border, in Dorset, in Devon and in Gloucestershire (Forest of Dean).

Animals from the latter site have crossed into Wales and become established in Monmouthshire.

Wild boar are also present in parts of South East and South West England, South East Wales and North West Scotland.

There is an estimated of 2600 wild boar out there, which is a very low number, therefore it can be a nice challenge, to capture them with your camera!

I personally love this kind of challenges, i will definietelly visit later this year to the forest of Dean, where the largest population is living and breeding!

I hope i can help with this article!

If you have some spare time, please check out my instagram:

https://www.instagram.com/wildlifeoftheplanetmpc/?hl=hu

Thank you!

What is blue green algae, why we have to be aware, and what to do if you see them?

Blue green algae became an issue in the Lake District in the last couple of years.

Blue-green algae certainly made a name for itself in 2018, to the extent that it hit the headlines and tripped off the tongue of many locals and visitors to the Cumbrian Lake District throughout the summer and autumn of 2018…and is now making a nuisance of itself again this spring of 2019.

To be technical, also known as Cyanobacteria, blue green algae are a naturally occurring photosynthetic organism that range from unicellular and filamentous forms to colony forming species. Some species have the ability to utilise nitrogen from air and water for photosynthesis (to create food), and can be found in most terrestrial and aquatic environments.

Is it safe to swim or let my dog swim?

Bloom and scum forming blue-green algae can produce toxins.

Toxin producing blooms are called Harmful Algal Blooms. These toxins can be harmful to wild animals, farm livestock and domestic pets.

In humans, they have been known to cause rashes after skin contact and illnesses if swallowed.

WHAT TO DO

Due to the turbidity of the water in some of the Lakes here from boats and wind, the blooms can appear and disperse quickly, but are unpredictable in nature.

If you notice anything that looks like a bloom, please report it to the Environment Agency incident line on 0800 80 70 60 which is open 24/7.

Can i go wild camping in the Lake District, UK?

Based on my research, you can legally camp in the wild, above the highest fell wall, only with a permission of a landowner, if you leave no trace, respect the environment, and being sensitive on the site, although i found a sentence on the Lake District official website saying: “though there is a tradition of wild camping in the Lake District.”

Also this:

As the National Park Authority we do not have the power to allow camping on private land and we do not permit camping on the land that we own.

Wherever you pitch, please remember that the landowners or their representatives have the legal right to order you to break camp and move on.

I’d say, it is not really a yes or no, but it is more likely yes. Just be respectful, sensitive and leave no trace!

Sometimes groups, such as young people on awards schemes, have arranged permission for camping in advance. However this does not mean these sites are open to everyone. Please check. Camping in car parks or on roadside verges is not allowed.

There are lots of fairly ‘wild’ campsites across the Lake District, with views of lakes and mountains… but with a real toilet and fresh water on tap!

There are also official “wild” campsites in the Lake District, here is the list for booking:

https://www.campsites.co.uk/search/campsites-in-the-lake-district?ch=DFBD2BCD-A5DE-45B9-B10B-522EBFCE78CE

Capturing Red Squirells in the UK with my camera

Omnomnom

So my target for this year is, that i would like to capture as many rare animals as i can with my camera in the UK.

I am living in London, and there are many squirells around here, but they are the grey species. I know that if you lucky you can get a photo of a Red Squirell, however for that, you need to travel to a bit more specific location.

There are an estimated 140,000 red squirrels in the UK, compared with more than two million greys.

The population in England is thought to be as low as 15,000.

Red squirrels (Sciurus vulgaris) live in coniferous forests and deciduous woods in Europe and northern Asia. Their range extends from the UK, Ireland and western Europe to Russia, Mongolia, and northwest China.

Population strongholds are Scotland, Northumberland, Wales, Northern Ireland, and the Lake District as well as on islands such as Brownsea.

If you want to see them in the wild, prime spotting times are morning and late afternoon because that’s when they’re most active.

In Cumbria you’re most likely to see them at Ridgewood, Arrowthwaite Wood, Shank Wood, and Spooner Vale.

My first trip will be in May to the Lake District, and hope i will have a chance to capture this little red mammal with my camera!

Wish me luck!

In the meantime, check out my instagram: https://www.instagram.com/wildlifeoftheplanetmpc/?hl=hu

Thank you!

February Photo Challenge – WINNER

Well, the first challenge is over!

This was the first month in our challenge series, we had really good photos shared!

I am really happy with the outcome, and hoping the next month will be even more popular!

As promised, i asked the winner, Tanya, to answer for a few questions regarding for her photography life!

1. When did you start photography?
I have been doing photography as a hobby since 2002. I started with a film SLR and got my first DSLR in 2006. At first I just enjoyed taking pictures of my children and pets. For the past 4 years I have really focused my attention to taking pictures of birds and animals.

2. What is your full name, how old are you, what do you do for living?
Tanya Hill, 40 yrs young, Registered Nurse

3. Best wildlife experience?
My best wildlife experience was photographing Humpback Whales in Maui.

4. What equipment are you using for photography?
I am a Nikon user. My main kit for birds & wildlife is D500 w/ 200-500mm f5.6

5. Favourite animal to take photo of?
My favourite animal to photograph is the owl, I have photographed the Barred, Short-eared, Great Horned, Saw Whet, and Barn owl.

6. Dream place to visit and take photo of wildlife?
I would like to take a trip to the Galapagos Islands. So many different birds and wildlife to see.

7. Dream animal to take photo of?
Blue Footed Booby

8. Future plan with photography? Career? Hobby? Where? How?
When I retire I would like to concentrate more on photography at a professional level. For now, I enjoy getting outside and capturing all the wonders of nature through the lens.


Our winner Tanya Hill with a beautiful little Sparrow:

Tanya’s instagram: https://www.instagram.com/tanyamaleephotography

Wildlife of the Planet instagram: https://www.instagram.com/wildlifeoftheplanetmpc/?hl=hu

Congratulations!

If you want to participate in this month challenge, check out here: https://wildlifeoftheplanet.wordpress.com/monthly-challenge/

Good luck to all!