What is the Bokeh-effect, and how to use it in wildlife photography?

There are a few common, and a few unique effect in photography as general, what helps us create different vibes, or help increase our photo’s quality. A few can be applied for wildlife photography also. One of it is a Bokeh-effect!


WHAT IS THE BOKEH-EFFECT?

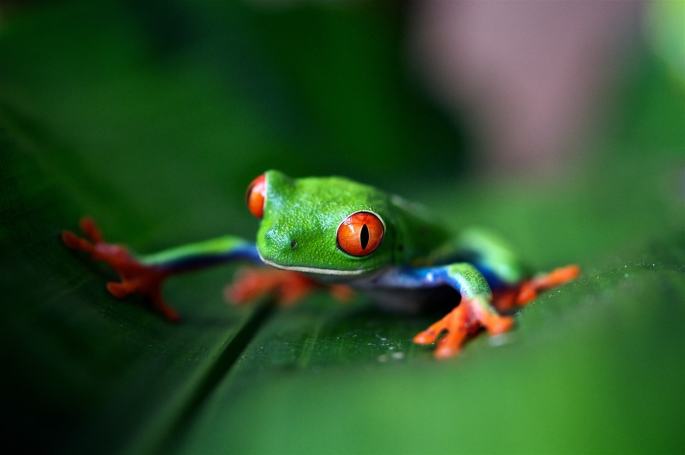
Bokeh-effect is when our subject(in our case it is an animal) is “pop-out” from the photo, staying sharp, till the background is blurry, out of focus! It will help us to force the focus on the subject animal. Bokeh-effect can be used to hide distracting elements. If you blur your background into oblivion, crisp details will disappear from it. It will become a dollop of colour and tone, and not much else. Thus, good Bokeh-effect contributes to a cleaner, more refined look.

ORIGIN

The origin of this effect comes from Japan, in Japanese language, Bokeh means blur.

The English spelling bokeh was popularized in 1997 in Photo Techniques magazine, when Mike Johnston, the editor at the time, commissioned three papers on the topic for the May/June 1997 issue; he altered the spelling to suggest the correct pronunciation to English speakers, saying “it is properly pronounced with bo as in bone and ke as in Kenneth, with equal stress on either syllable”. The term bokeh has appeared in photography books as early as 1998. It is sometimes pronounced /ˈboʊkə/ (boke-uh).


WHAT IS SOFT FOCUS, AND WHAT IS THE DIFFERENCE BETWEEN SOFT FOCUS AND BOKEH-EFFECT?

In soft focus photography there is an intentional blurriness added to the subject while the actual edges are retained in sharp focus, but with Bokeh-effect it is only an element of the image that is intentionally blurred. Additionally, Bokeh-effect tends to emphasise certain points of light in the our photo as well.


BOKEH-EFFECT IN WILDLIFE PHOTOGRAPHY

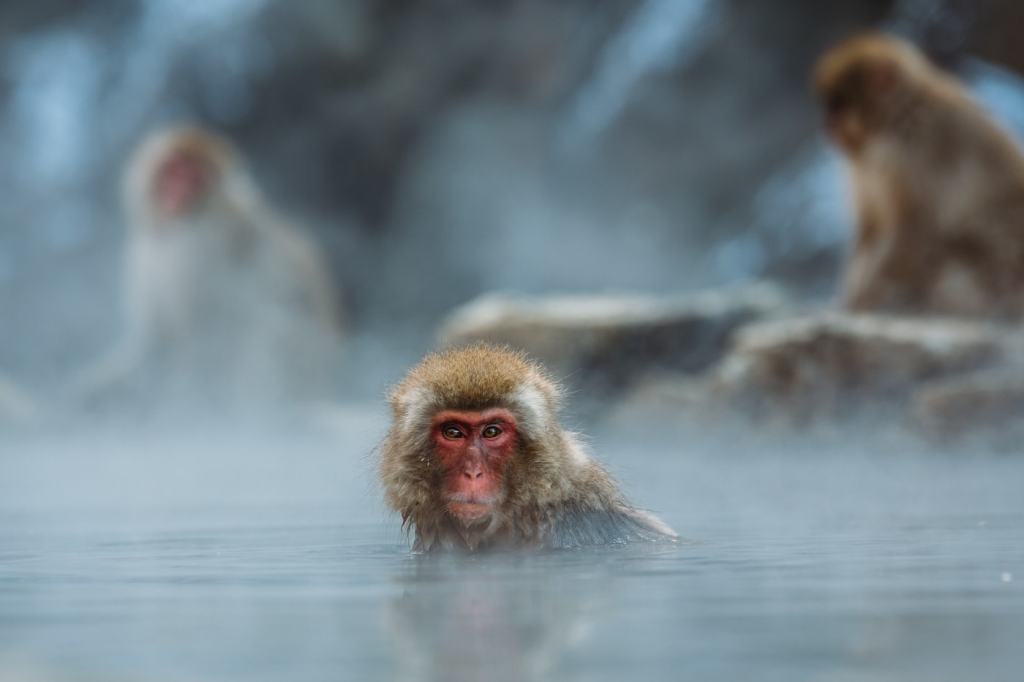
Now, the difference between other photography environments and wildlife is that, in the nature, the background can be really complex, and without proper preparation, it can ruin the photo pretty easy.

With the Bokeh-effect, we can create great images, even with the most complex and extreme backgrounds. How?

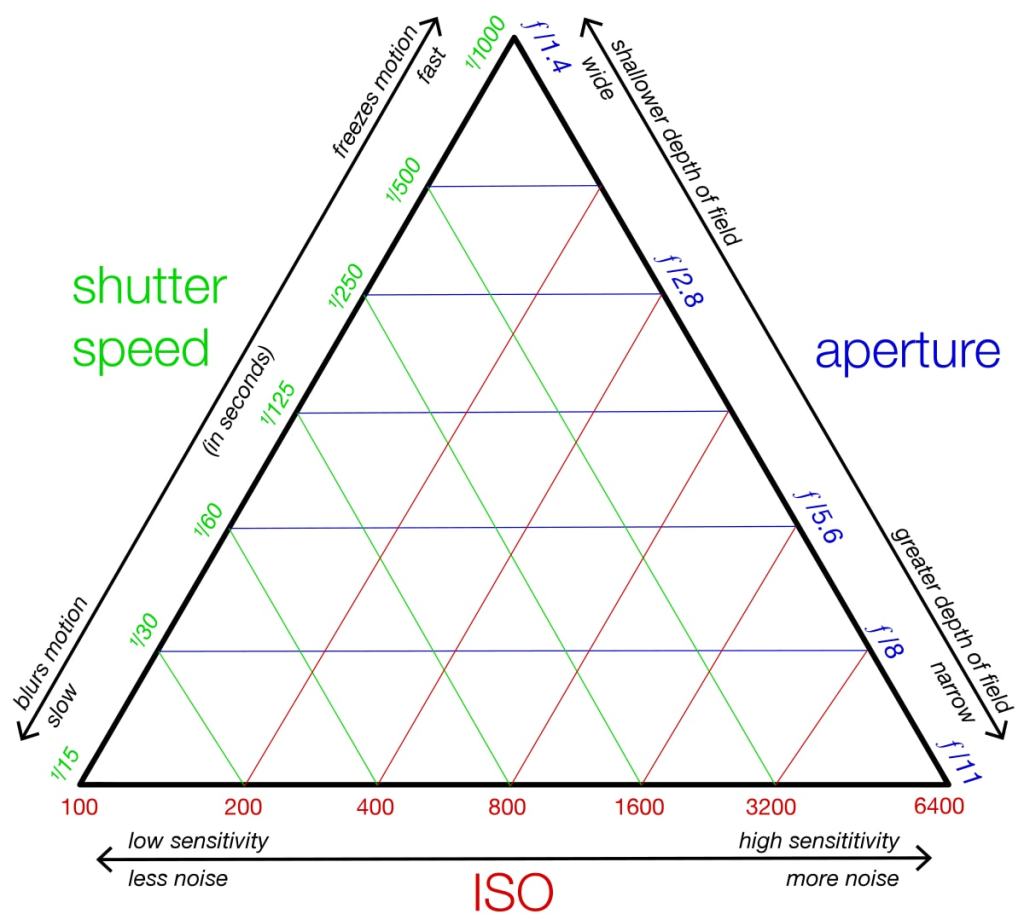
At first, we will need a good aperture setting with the lowest f-number possible(widest aperture). With this setting, you can create a much more shallower depth of field, therefore your background will become more blurry.

We have to mention here that, the distance between your subject animal and the background will have influence on the softness of the Bokeh-effect also. The greater the distance, the smoother(more blurry) the background will be. It is essential to keep this in mind, however we know, it is really hard to prepare, and get influence on this, because of nature is unpredictable, and your subject animals won’t follow any rules or patterns for correct wildlife photography.

Also keep in mind, not every image needs this effect, we don’t have to always look for the Bokeh-effect in our wildlife photography. In fact, starting to use wide-angle lenses become more popular nowadays.

Using the right lens can be beneficial, however not essential, we can create Bokeh-effect, without a long telephoto lens, the only thing we have to do is get closer to our desired animal, carefully!

Try out the Aperture Priority mode, it works well in order to create Bokeh-effects, however, if it isn’t working, simple change to manual.

If your aim is to intentionally create Bokeh, choose your background carefully, before you start to photograph, or set up your tripod.

Speaking about the importance of the background, sometimes our foreground is as important as the background of the image. Good composition as general can be extremely beneficial.


WHAT ARE THE “RIGHT” SETTINGS IN ORDER TO CREATE BOKEH-EFFECT?

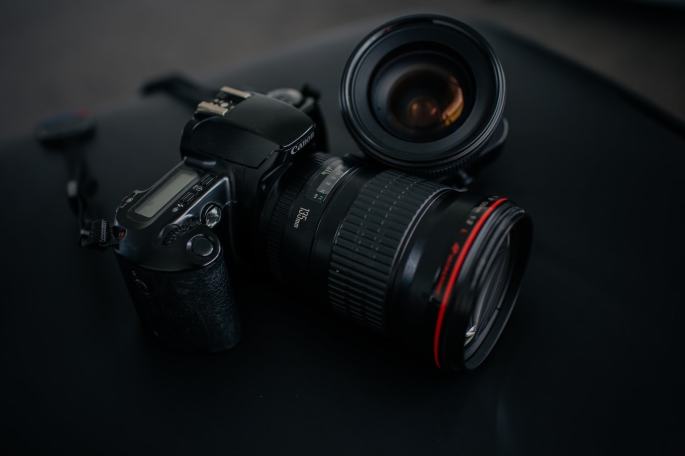
To achieve Bokeh-effect in wildlife photography you need a fast lens with at least an f/2.8 aperture (although wider apertures like f/2, f/1.8 or f/1.4 are better). When shooting, make sure the lens is wide open. Most photographers prefer to shoot in a manual mode as well, so they can set their aperture and shutter speed manually, and it can result higher quality images!

The larger focal length of the lens will decrease the depth of field.  For example, a 14mm lens would have a greater depth of field at f/4 than a 400mm lens would have at f/4. So, the greater the focal length, the softer the Bokeh-effect assuming we are using constant aperture.

Physically, sensor size doesn’t have anything to do with the amount of blur. But, in practice, it does.

If you use the exact same lens on a full-frame and a 1.5x camera, the crop camera will force you to move away from your subject to keep the same framing.

Now, we know that subject distance does indeed affect Bokeh – the further you stand, the less Bokeh-effect you will have.


BAD OR DISTRACTING BOKEH-EFFECT

With all that said, obviously we can, and probably we will shoot bad images with this effect, I did a lot during my practice, and this is absolutely normal, this is how learning works! However, there are a few things we can immediately can avoid with a little attention!

In my opinion, if the background is really distracting, confusing, and take the focus out from your subject animal, than it is a bad Bokeh-effect for me. Just be aware of this, and keep practice!


IS LIGHTING IMPORTANT FOR BOKEH-EFFECT?

Obviously, light is one of the most important factor in wildlife photography as general. If you’re in controlled conditions where you can adjust your light and want to experiment, you may find that opening your aperture wide works best.

Remember, this is going to have the smoothest results, and produce the greatest Bokeh-effect possible. The light source doesn’t have to come from behind the subject. It can just be incidental light creeping through a well-lit scene.


CONCLUSION

Knowing different techniques for wildlife photography will make you more confident and better photographer. You will be able to capture moments with your camera, which you would not without knowing the techniques.

Bokeh-effect is one of it, and it is extremely useful in many many cases, when it comes to wildlife photography! Just keep in your mind, in your “tool-box”, and use it, whenever you feel to it!

I hope I could help with this article, and I hope you will be able to use this technique in your photography!

If you have some spare time, please check out my Youtube Channel: https://www.youtube.com/channel/UC6Vgiw_7TZrN7Lx2cFLA5eQ?view_as=subscriber

If you have some spare time, please check out my Instagram: https://www.instagram.com/wildlifeoftheplanetmpc/?hl=hu

Thank you!

Camera settings, part 3: Aperture in wildlife photography

After writing about the importance of ISO and shutter speed, we finally arrived to the third pillar of settings, which is the aperture! With this three article, we should understand the relation of this three settings, and how they are working!

THE RELATION BETWEEN ISO, SHUTTER SPEED AND APERTURE

The triangle

WHAT IS APERTURE?

Aperture is the setting, which controls, how much your camera lens is opened or closed. It is either widen the opening or narrow it down, depends on the value of the aperture!

As a result, you will be able to actually control with this that, how much light can enter into your camera. With the Aperture Priority mode on your camera, you can adjust this manually!


THE VALUES OF APERTURE

The value is given with f-numbers, like f/2, f/4 and so on. Between the numbers and the state of the opening has an inverse relation, it means, that as we increase the f-number, the opening will narrow down.

Usually the maximum aperture is f/1.4(widest opening), and the minimum is f/22(smallest opening or most narrow).


WHAT IS THE INFLUENCE OF APERTURE ON YOUR FINAL IMAGE?

A higher aperture(smaller opening) will result a larger depth of field(larger area of focus), till the smaller aperture will result a smaller depth of field.

WHAT IS DEPTH OF FIELD?

To be completely honest, when I studied aperture, it wasn’t that straightforward for me, what is exactly depth of field. In case someone else is struggling with it also, I will try to explain it as simple as I can!

Depth of field refers to the distance between the closest and the farthest objects in a photo that appears acceptably sharp. Generally, a large aperture results in a large amount of foreground and background blur, yielding shallow depth of field. On the other hand, a small aperture results in small amount of foreground and background blur, yielding wide depth of field.


CHOOSING THE “RIGHT” APERTURE FOR WILDLIFE PHOTOGRAPHY

There are a lot of opinions existing regarding the right aperture for wildlife photography, however, like a lot of other things in photography, it can be very subjective. I will try to give some basic guidelines here, but I encourage everybody to practice, and try out what is working for them and what is not.

Now, with fast-moving animals, in order to capture them properly with your camera, generally speaking you will need wider aperture. It can also provide a really diffused background!

What is often missed and overlooked about using a wide aperture though, is the issue of key elements of an animal’s body being out of focus due to the shallow depth of field.

To understand this, I will try to give you an example here. Imagine, we want to photograph a bird, for a portrait. We are focusing on the eyes, which will be really sharp, however the beak will be out of focus. It is because the depth of field is too small, therefore using a smaller aperture in this case would result a better image! With portraits, it is important, that the whole head is sharp, so choose the correct aperture setting carefully knowing this!

Also, keep in mind, that the closer your subject to the camera, the smaller the depth of field will be!

When we are preparing our camera settings, we should start from the widest aperture possible, and adjust from there, if we need for our wildlife photography!


WHEN WE SHOULD USE APERTURE PRIORITY MODE?

Now, generally speaking, the best time using aperture priority mode, if we one, not really familiar with our camera settings yet, or two, we are photographing in a really fast-changing environment, in terms of lighting!

Aperture priority is a good choice, when you are capturing birds flying around with your camera.


COMBINING THE THREE PILLAR SETTINGS TOGETHER

Now, lot of camera is coming with Auto Mode, where the camera will set up the ISO, shutter speed and the aperture automatically. In order to photograph wildlife on a higher level, we should know how to adjust these settings in relation with each other.

Whenever you press your shutter button, the light will enter into your camera, then it goes through the aperture hole. Once the light goes past the lens aperture, it then hits the shutter curtain, which is like a window that is closed at all times, but opens when needed. The shutter then opens in a matter of milliseconds, letting the light hit the camera sensor for a specified amount of time. Now, after this, the sensor gathers the light, and your ISO brightens the image if necessary (it will also result grainy and lower quality images sometimes, so be careful). Then the shutter closes and the light is completely blocked from reaching the camera sensor.

In bright conditions when lots of light can enter in the lens, with a very small lens aperture, we would need more time, i.e. longer shutter speed for the sensor to gather enough light to produce a properly exposed image.

What would happen if the lens aperture/hole was very big? Obviously, a lot more light would hit the sensor, so we would need a much shorter shutter speed for the image to get properly exposed.

These are just a few examples, obviously a lot more scenario exists, this is the beauty of wildlife photography! In nature, with many different environment and animals, we will find ourselves in so many different situations, we should make sure we are prepared and ready!


CONCLUSION

If you read the first and the second part, you should start to see the relations between the settings. With the guidelines I am sharing here and the necessary practice, we should be able to develop with our wildlife photography in a short period of time!

Just knowing this three settings will increase your chances for better images, mastering them is essential in order to become a good wildlife photographer. Obviously, on your journey, you will find your best settings, which works best for you and with you.

Experiment if you would like, feel free to try out different options, with keeping the basic knowledge in mind!

I hope I could help with this article, if you wanted to know more about aperture, or you are new in wildlife photography! Enjoy!

If you have some spare time, please check out my Youtube Channel: https://www.youtube.com/channel/UC6Vgiw_7TZrN7Lx2cFLA5eQ?view_as=subscriber

If you have some spare time, please check out my Instagram: https://www.instagram.com/wildlifeoftheplanetmpc/?hl=hu

Thank you!