Camera settings, part 3: Aperture in wildlife photography

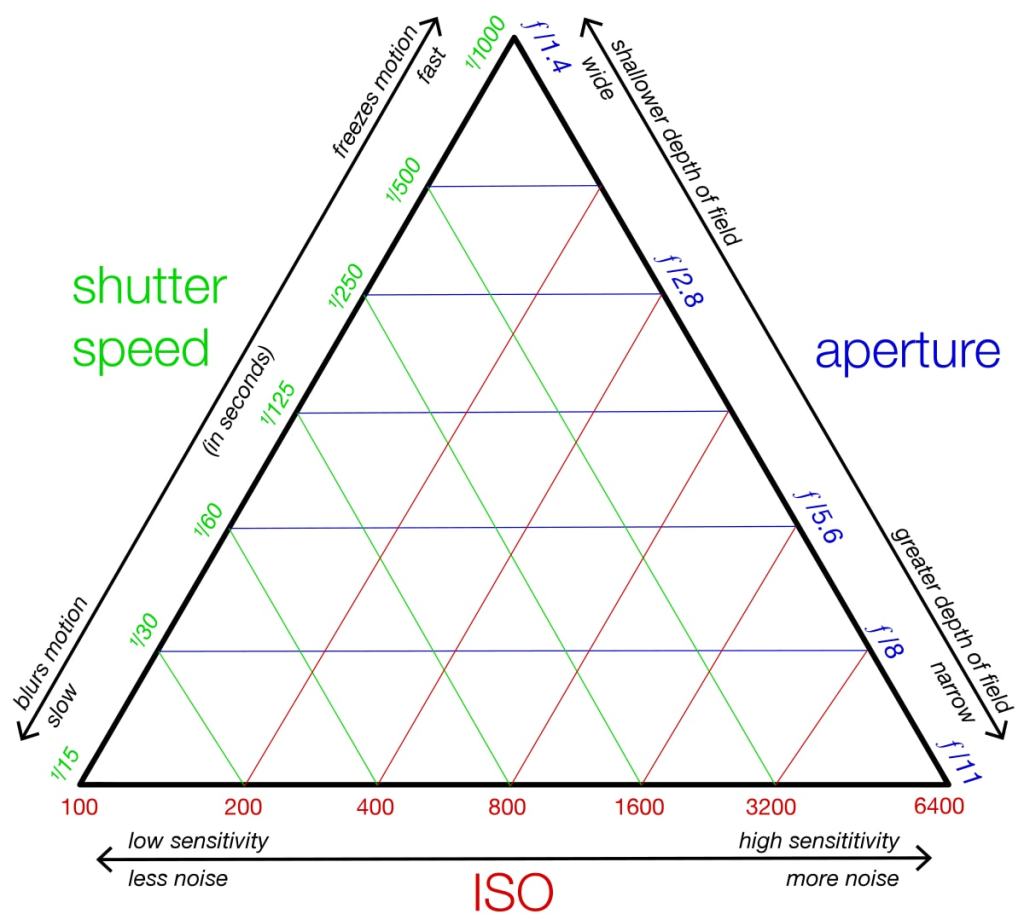
After writing about the importance of ISO and shutter speed, we finally arrived to the third pillar of settings, which is the aperture! With this three article, we should understand the relation of this three settings, and how they are working!

THE RELATION BETWEEN ISO, SHUTTER SPEED AND APERTURE

The triangle

WHAT IS APERTURE?

Aperture is the setting, which controls, how much your camera lens is opened or closed. It is either widen the opening or narrow it down, depends on the value of the aperture!

As a result, you will be able to actually control with this that, how much light can enter into your camera. With the Aperture Priority mode on your camera, you can adjust this manually!


THE VALUES OF APERTURE

The value is given with f-numbers, like f/2, f/4 and so on. Between the numbers and the state of the opening has an inverse relation, it means, that as we increase the f-number, the opening will narrow down.

Usually the maximum aperture is f/1.4(widest opening), and the minimum is f/22(smallest opening or most narrow).


WHAT IS THE INFLUENCE OF APERTURE ON YOUR FINAL IMAGE?

A higher aperture(smaller opening) will result a larger depth of field(larger area of focus), till the smaller aperture will result a smaller depth of field.

WHAT IS DEPTH OF FIELD?

To be completely honest, when I studied aperture, it wasn’t that straightforward for me, what is exactly depth of field. In case someone else is struggling with it also, I will try to explain it as simple as I can!

Depth of field refers to the distance between the closest and the farthest objects in a photo that appears acceptably sharp. Generally, a large aperture results in a large amount of foreground and background blur, yielding shallow depth of field. On the other hand, a small aperture results in small amount of foreground and background blur, yielding wide depth of field.


CHOOSING THE “RIGHT” APERTURE FOR WILDLIFE PHOTOGRAPHY

There are a lot of opinions existing regarding the right aperture for wildlife photography, however, like a lot of other things in photography, it can be very subjective. I will try to give some basic guidelines here, but I encourage everybody to practice, and try out what is working for them and what is not.

Now, with fast-moving animals, in order to capture them properly with your camera, generally speaking you will need wider aperture. It can also provide a really diffused background!

What is often missed and overlooked about using a wide aperture though, is the issue of key elements of an animal’s body being out of focus due to the shallow depth of field.

To understand this, I will try to give you an example here. Imagine, we want to photograph a bird, for a portrait. We are focusing on the eyes, which will be really sharp, however the beak will be out of focus. It is because the depth of field is too small, therefore using a smaller aperture in this case would result a better image! With portraits, it is important, that the whole head is sharp, so choose the correct aperture setting carefully knowing this!

Also, keep in mind, that the closer your subject to the camera, the smaller the depth of field will be!

When we are preparing our camera settings, we should start from the widest aperture possible, and adjust from there, if we need for our wildlife photography!


WHEN WE SHOULD USE APERTURE PRIORITY MODE?

Now, generally speaking, the best time using aperture priority mode, if we one, not really familiar with our camera settings yet, or two, we are photographing in a really fast-changing environment, in terms of lighting!

Aperture priority is a good choice, when you are capturing birds flying around with your camera.


COMBINING THE THREE PILLAR SETTINGS TOGETHER

Now, lot of camera is coming with Auto Mode, where the camera will set up the ISO, shutter speed and the aperture automatically. In order to photograph wildlife on a higher level, we should know how to adjust these settings in relation with each other.

Whenever you press your shutter button, the light will enter into your camera, then it goes through the aperture hole. Once the light goes past the lens aperture, it then hits the shutter curtain, which is like a window that is closed at all times, but opens when needed. The shutter then opens in a matter of milliseconds, letting the light hit the camera sensor for a specified amount of time. Now, after this, the sensor gathers the light, and your ISO brightens the image if necessary (it will also result grainy and lower quality images sometimes, so be careful). Then the shutter closes and the light is completely blocked from reaching the camera sensor.

In bright conditions when lots of light can enter in the lens, with a very small lens aperture, we would need more time, i.e. longer shutter speed for the sensor to gather enough light to produce a properly exposed image.

What would happen if the lens aperture/hole was very big? Obviously, a lot more light would hit the sensor, so we would need a much shorter shutter speed for the image to get properly exposed.

These are just a few examples, obviously a lot more scenario exists, this is the beauty of wildlife photography! In nature, with many different environment and animals, we will find ourselves in so many different situations, we should make sure we are prepared and ready!


CONCLUSION

If you read the first and the second part, you should start to see the relations between the settings. With the guidelines I am sharing here and the necessary practice, we should be able to develop with our wildlife photography in a short period of time!

Just knowing this three settings will increase your chances for better images, mastering them is essential in order to become a good wildlife photographer. Obviously, on your journey, you will find your best settings, which works best for you and with you.

Experiment if you would like, feel free to try out different options, with keeping the basic knowledge in mind!

I hope I could help with this article, if you wanted to know more about aperture, or you are new in wildlife photography! Enjoy!

If you have some spare time, please check out my Youtube Channel: https://www.youtube.com/channel/UC6Vgiw_7TZrN7Lx2cFLA5eQ?view_as=subscriber

If you have some spare time, please check out my Instagram: https://www.instagram.com/wildlifeoftheplanetmpc/?hl=hu

Thank you!

Camera settings, part 2: Shutter speed in wildlife photography!

In the first part, I was writing about ISO, one of the pillar settings for photography. The second will be the shutter speed. I will try to share as much information as I can, and write as clear as I can, in order to be comprehensible!

Let’s start!


WHAT IS SHUTTER SPEED?

In every camera, in front of the sensor, you can find a shutter. When you take a photo, this shutter opens and closes to let light reach the sensor, creating your image. Shutter speed describes how quickly or slowly the shutter opens and closes again. A fast shutter speed means that the shutter is only open for a short period of time; a slow shutter speed means the shutter is open for longer.


THE VALUES OF SHUTTER SPEED

The measure for shutter speed is seconds, or the fraction of a second. For example 1/200 shutter speed will allow light to go into your camera for 0.02 second. With other words, the shutter will open for only 0.02 second for your photo.  This is also known as the exposure time, because it’s the amount of time the sensor is exposed to light.

Most of the modern cameras nowadays can handle 1/8000 shutter speed, or sometimes even more! On the other side of the measure, the longest shutter speed available on today’s cameras is 30 seconds!

LONG AND SHORT SHUTTER SPEED

Using a long shutter speed will result motion blur.  If your shutter speed is long, moving subjects in your photo will appear blurred along the direction of motion. This technique often used in the photography industry.

Using a fast shutter speed however will result a pin-sharp image(if other settings are correct). fast shutter speed will allow us to completely freeze the motion on the photo.

Fast shutter speed is usually used in bird photography, where capturing these animals in flying require more advanced settings.


AUTO SHUTTER SPEED OR MANUAL?

If we choose automatic shutter speed, sometimes it will result badly exposed and highly blurred images, so it is worth to learn how to use properly shutter speed manually.

This is particularly true when the camera is shaking a lot(hand-held for example).


CHOOSING THE “RIGHT” SHUTTER SPEED FOR WILDLIFE PHOTOGRAPHY

As I mentioned before, photographing moving objects require more advanced settings. Fortunately we have a chance sometimes to capture the subject animals when they are still, or moving slowly, but most of the time, they are moving quickly, flying, running and so on.

To prepare for that, we can choose fast shutter speed. There is not really a rule for exactly how fast, but generally speaking you want your shutter speed faster than 1/600, I would say!

Now, in order to be able to capture and freeze the moment properly, with the fast shutter speed we will need light. In a bright and sunny day, light won’t be a problem. ISO settings will come in the picture here, when you would like to photograph with fast shutter speed in low-light environment, and in this case you might need to adjust your ISO settings!

SHUTTER SPEED FOR BIRD PHOTOGRAPHY

Imagine a kingfisher coming out from the water, water drops are everywhere, really quick movements, the whole thing is happening in less than a second! Capturing these kind of moments requires a really really fast shutter speed, using 1/2000 or even higher shutter speed is not rare, and I would recommend to use the same with your photography, if you would like to take successful photos of rapidly-moving birds.

Always study and know, what will be your subject animal. Just to get the feeling of it, photographing hummingbirds may require shutter speed as fast as 1/8000, however a slowly moving ostrich in Africa will require “only” a 1/800 shutter speed setting for example!

It is always better to be prepared, than missing a unique moment, because of a low shutter speed!

BLURRING MOTION

Some people are like this technique, with this you can create unique photos. However, it’s a bit more challenging since slower speeds require more steady hands and in most cases a tripod to make sure the camera is perfectly still. For example, if you are shooting at ½ of a second, and the photographer moves the camera ever so slightly it will result in an entirely blurry photo.

Lot of landscape photographer using this technique in order to capture the views in a unique way, but keeping the “movement”on the photo with the motion blur technique(like a waterfall image for example).


CONCLUSION

Shutter speed, as a second pillar of the main camera settings, is probably one of the most important one! Knowing properly how to use it in wildlife photography, is essential, without it, you will never be able to photograph pin-sharp images!

Generally speaking, always try to use the highest shutter speed possible, because in wildlife photography, your subject animal will move fast, and quick, and won’t be easy to capture them properly with your camera!

I hope I could help with this article for beginner wildlife photographers, or for those who had some doubts about shutter speed and how it is exactly working!

If you have some spare time, please check out my Youtube Channel: https://www.youtube.com/channel/UC6Vgiw_7TZrN7Lx2cFLA5eQ?view_as=subscriber

If you have some spare time, please check out my Instagram: https://www.instagram.com/wildlifeoftheplanetmpc/?hl=hu

Thank you!

Camera settings, part 1: ISO in wildlife photography?

For wildlife photography, there are a few camera settings, we have to know off the top of our head. We won’t have that much time out there, thinking about what settings we should use, we have to be ready for the subject!

Now, in order to be ready, to start with, we have to know the three pillars(settings) which helps us producing better images! Yes, you are right, the first one is the ISO. We will talk about the other two in the next parts of these articles.


WHAT IS ISO?

To keep it real simple, the ISO is a setting, which will determine if our picture will be darker or brighter! Whenever you will increase the ISO number, your photo will be more bright, if you lower the number, the photo will be more dark. The ISO settings will allow you to photograph in more dark environments!

However, if we increase the ISO too much, our photo will show a lot of grain, also called “noise”, which possibly can ruin our image!


THE VALUES OF ISO

Every camera has a different range of ISO values, that you can use. Most of the time, this number starts from 100 (low ISO), and doubles up itself up to 6400 (high ISO). For example, the ISO 200 will twice that bright than the ISO 100.


BASE ISO

Older cameras has a base ISO at 200, nowadays, most of the dslr cameras start from ISO 100. Generally speaking, we always try to stick with the lowest ISO possible, but obviously we can’t in many cases, like when we are photographing in low-light conditions. However, many professional wildlife photographer says that, keep your ISO highest possible, because in that case, you have one less control you need to think about. This is also true, and you will be able to decide what works for you after a while!


CHOOSING THE “RIGHT” ISO FOR WILDLIFE PHOTOGRAPHY

Before we get into this, I would like to mention, that I heard many different opinion about choosing the ISO, it is quite a controversial topic. I would recommend, to explore your camera, and experiment, however keep in mind, what I share here, and you could use it, as a guideline for your photography.

Choose an ISO based on what you are shooting. If you are shooting a portrait of a bird or animal, choose a lower ISO and when shooting action, select a higher ISO. 

AUTO ISO

Whatever is your aim, and subject animal, most likely you won’t need auto ISO, as it can ruin your image. It is better in most cases to adjust ISO manually!

Auto ISO although works well in bird photography in most cases, if your shutter speed is really close to minimum, try it out if you have a chance!

On most cameras, you can choose the value of a minimum and the maximum of the ISO. If the ISO is not completely automatic, set up values can increase the quality of your images!

Now, ISO is working correctly with other settings, so set up the correct ISO will depend on different camera settings, like aperture, shutter speed. The optimal advice is, that keeping your ISO high allows you to be able to capture more sharp images, being brave with your ISO it can be rewarded. Also, have t mention, that most of the gears nowadays can handle noise even around ISO 600, therefore you can experiment with high ISO number.

ISO FOR BIRD PHOTOGRAPHY

If we choose to set the ISO manually for bird photography, we should consider the lighting conditions for out settings. On a bright, sunny day, we probably won’t need too high ISO, setting it up around 400-800 should do the job! It will allow to capture birds during flying, and still shoot sharp images!

Now, as we probably know, the lighting conditions for bird photography is the best on the early mornings, and the later evenings! The ISO number should be adjusted in relation with this conditions!


COMMON ISO MYTHS

Is ISO Part of Exposure?

No, ISO is not part of exposure. Shutter Speed and Aperture brighten your photo by physically capturing more light. ISO doesn’t do that; instead, it essentially brightens the photo you already captured. So, photographers don’t consider it to be a component of exposure. However, it is part of the three pillars!

What is the Best ISO Setting for Low-Light?

When shooting in low-light conditions, your shutter speed will typically decrease, resulting in camera shake or motion blur. To avoid such issues, you should increase ISO setting to a higher value, such as ISO 1600. Depending on your aperture and light conditions, you might need to increase ISO even more.


RELATION OF ISO AND SHUTTER SPEED

When shooting wildlife, shutter speed is especially important because the movement of the animals. If your pictures are blurred due to a slow shutter, lack of digital noise is irrelevant. Therefore, the strategy that you have to use in circumstances where the light is low is this: raise the ISO until the shutter speed is fast enough to get a sharp picture.

HOW DOES ISO AFFECT EXPOSURE?

The camera’s ISO scale is similar to shutter speed in the sense that, when doubled, the exposure is also doubled. They are proportional to one another. A low ISO number will give a low exposure and a high ISO will give a high exposure. It’s much simpler then aperture.


CONCLUSION

Knowing your camera is essential, in order to create beautiful and high quality images. Knowing ISO is part of the journey to the development. Sometimes you just won’t have enough light, and conditions. ISO will be your friend in these situations, and if you know, how to adjust, you will start photographing better images! This is the first step, knowing ISO and how it works is a must.

I hope I could help with this article for those, who does not clearly understand the concept of ISO, or just about to start wildlife photography. Have fun!

If you have some spare time, please check out my Youtube Channel: https://www.youtube.com/channel/UC6Vgiw_7TZrN7Lx2cFLA5eQ?view_as=subscriber

If you have some spare time, please check out my Instagram: https://www.instagram.com/wildlifeoftheplanetmpc/?hl=hu

Thank you!

How do you keep your photography gear clean and tidy?

Talking about how to treat your gear is essential, and to be honest, is not that straightforward as it sounds at first hear! Also, there are many mistake we can avoid, if we are aware and treat our equipment with care! I think this topic is important, that is why i decided to write down this as a blog post!

I have a confession here, in the beginning i did not pay too much attention about cleaning, i was lazy i have to be honest, however after an unsuccessful shoot, where i could not be able to capture my desired subject with my camera as i wanted to, because my lens wasn’t 100 % clean, i decided i will spend more time get my gear ready and keep them as tidy as possible!


Now, as the technology is developing really quick, it is obviously applies for the photography gear also, we have more sensitive and precise components to keep clean, therefore we have to be even more careful when it comes to keeping our camera and accessories tidy!

Imagine if we are shooting images in rain, in the middle of a forest, where everything is muddy and wet. After this kind of sessions we have to have a little tidy up, otherwise we will risk our success for the next session, as i mentioned a very little dirt is perfectly enough on our lens to ruin the photography experience out there!


To start with, we have to make sure the room when we are cleaning, is dust free, and i also recommend to get an anti-static microfiber cloth.

There is also a very useful tool, it is called dust cleaning gel, which is easy to use, and do a great job on the gear!

Now, the next one is, where you can make your first mistake. Lot of people are using ordinary cloth to clean the lens, and you can damage your glass pretty easy at this point! What you can do is, use a compressed air can to get rid of any dust in the glass. The next step is to use a lens pen, and start to clean that glass properly! I would not recommend to use any kind of chemicals on the lens, i can be damaging, i would not risk it!

Never forget to clean the lens cap also, for obvious reason. You can also consider to replace your lens cap time to time, it will give your gear a newer look!

Your viewfinder will also need some cleaning up. For this, you can use q-tips, but choose a really soft one, to make sure you are not harming the glass. The LCD glass is a really important component, so obviously we can’t leave it out from the cleaning process!

Now, the next step where you can make a lot of mistake is that try to clean the inside of the camera without knowledge. It is a big mistake, where you can ruin your whole camera. There are two ways here really, you either master your knowledge about how to get into your camera safely, or you speak with a trained technician and ask for technical assistance for your gear!


We finished our process here with the camera and the lens, let’s see what else to do!

Make sure you are vacuum your camera bag properly, you obviously will need a smaller vacuum for the job, you can even wash the bag, if its dirty, it is always up to you how fussy are you with cleaning!

Don’t leave your other smaller accessories out the party, and make sure your tripod is ready to work also.

Remove batteries from devices such as flashguns so there’s no risk of them leaking into your gear. Try to use high-quality rechargeable batteries and chargers, and store them carefully. Another good tip is to number your batteries so you can be sure to use them in rotation, because this increases their life.


HOW OFTEN WOULD I CLEAN MY GEAR?

The answer is depends on a few things. First, the conditions where you are shooting your images, the frequency of your photography sessions, how many accessories you have, and obviously how fussy you are with cleaning the gear!

I recommend that at least every two weeks have a look on your gear, and try to keep everything clean and tidy, it will reward you when you go out there, i promise!

You can find some useful tools here for cleaning your gear!


SHOULD I HAVE A CAMERA INSURANCE?

While good camera insurers will pay out for accidental damage to a camera, they are sometimes very specific about the exact circumstances in which the damage occurred. If you’re travelling with your camera when it’s damaged, for example, they may require proof that it was in a purpose-made case. Similarly, mechanical breakdown may only cover for items that are less than five years old. So yes, it is helpful in many cases, but you have to decide if it is worth for you, or not!

I hope it is a helpful article, and make sure you will use this process to keep your gear tidy, it is essential!

If you have some spare time, please check out my Youtube Channel: https://www.youtube.com/channel/UC6Vgiw_7TZrN7Lx2cFLA5eQ?view_as=subscriber

If you have some spare time, please check out my Instagram: https://www.instagram.com/wildlifeoftheplanetmpc/?hl=hu

Thank you!

Everything you need to know about camera traps!

WHAT ARE CAMERA TRAPS?

A camera trap is a remotely activated camera that is equipped with a motion sensor or an infrared sensor, or uses a light beam as a trigger. Camera trapping is a method for capturing wild animals on film when researchers are not present, and has been used in ecological research for decades.

Wildlife photographers and researchers using camera traps for different reason, however animals are benefiting from this method, because camera traps can capture the subject animal with a very little human interference.

The great advantage of camera traps is that they can record very accurate data without disturbing the photographed animal. These data are superior to human observations because they can be reviewed by other researchers. On the other hand, for wildlife photographers, it can be an option to capture animals, that they would not be able to otherwise, like a polar bear in it’s natural habitat, or a leopard close-up!


HOW ARE CAMERA TRAPS WORKING?

A camera trap’s two main components are a camera to capture images and a trigger to set off the camera.

A camera trap’s capture of a still image or video is triggered by a passive infrared detector that responds when something hotter or colder than the background moves in its detection zone. There are two main components in a PIR sensor; the Fresnel lens and the pyroelectric sensor. The Fresnel lens focuses incoming electromagnetic radiation onto the pyroelectric sensor which then triggers the camera to capture an image or to start recording.

Target detection is camera traps’ weak point, and they need to be set up so that animals move across their detection zone rather than towards or away from the camera. Short trigger and recovery times are preferred.

After dark, camera traps illuminate the subject with infrared light that is difficult for animals to see, or white light if colour images are required. During the day, stills and video are captured in colour, and at night in monochrome under infrared, or in colour with white illumination. Where cameras need to be sited depends on study design. Camera performance is sensitive to the height and angle that they are mounted at; maximum detections come from cameras just below the target’s shoulder height, aimed horizontally. To avoid large numbers of false triggers, trim vegetation in the detection zone that might be moved by the wind. Keep cameras clean and change batteries frequently.


HOW DO YOU SET UP A CAMERA TRAP?

Before setting up a trap you have to find the best spot. Once we know roughly where we are going to put the camera we look for the best tree, or pair of trees in some cases, to attach the traps. We look for game trails, small creeks, ridges and other places where we think we have the best chance of getting a photo.

The camera trap system is basically just a medium-sized black waterproof box, with a ‘heat in motion’ sensor and camera inside. When something warm (like a mammal) crosses the beam, it takes a photo – so the box needs to be close to the ground. The “dry” box ensures that the camera, sensors and film stay dry – and in an area that gets up to 18 feet of rain per year – this is very important. Then we attach the trap to the base of a tree (1-2 feet off the ground) using a piece of webbing (like a belt), and lock it on with a cable lock. We use a laser beam to aim the trap across where we want the animals to trigger the camera. Finally we take one photo to make sure it works then leave it for a few weeks.

USEFUL INFORMATIONS ABOUT CAMERA TRAPS

Camera traps are becoming incredibly fashionable, and it opens up a whole new unseen world to wildlife photographers. In fact, I’d go as far as to say that camera trapping is extremely addictive. The entire process, from setting up your DSLR camera trap to checking it weeks later for the results, has a real thrill about it.

When you found your location, study the lightning in the area, where the sun comes from, and also try to find the best settings for your camera trap!

Camera trapping is all about predicting where your subject might be, and “forcing” them into the composition of your image. Walking through a forest, for example, will allow you to spot “runs” in the grass. This tends to be a thin line of compressed blades of grass, showing you the regular path followed by an animal.

It can be very, very tempting to continually check your camera trap. But every time you visit the trap, you’ll be contaminating it with your scent and disturbing the area in general. Instead, leave it be for as long as possible. Work out how long the battery will last, and resist the temptation to keep checking your setup.


HOW MUCH DOES IT COST TO SET UP A CAMERA TRAP?

Camera traps consist of either a digital or 35mm film camera, usually the small ‘point-and-shoot’ variety, a housing to hold the camera, and an infrared sensor. The trap is usually set up along a path known to be used by animals, with the infrared sensor and its receiver shooting across the path. When an animal (or human!) passes through the infrared beam a photo is taken. Depending on the type of camera (digital or film) camera traps typically cost between $400-$700 USD.


IS MY CAMERA TRAP EFFECTED BY WHEATHER?

Humidity has a highly negative effect on camera traps and can result in camera malfunction. This can be problematic since the malfunction is often not immediately discovered, so a large portion of research time can be lost. Often a researcher expecting the experiment to be complete will track back to the site, only to discover far less data than expected – or even none at all.


THE BEST CAMERA TRAPS 2020

Victure Wildlife Trap Camera 20MP Low-budget gear, great for beginners!

XINTONGVDDDA Camera Trail Wildlife Camera  Affordable, great value product!

KY Wildlife Camera  One of the most reliable in the market right now!

ZLMI Outdoor Wildlife Camera Trap Still affordable, for experts!

KY Wildlife Camera Wildlife Trail Camera Great value, easy to set up!

Tierlr Outdoor 4G Wildlife Trail Camera Professional high-end camera trap!


Well, i hope i could help, if you are thinking about trying out a camera trap, or you looking for products to buy! One thing is sure, it is really a fun experience having one of these camera traps, i encourage you to try out if you haven’t already yet!

If you have some spare time, please check out my Youtube Channel: https://www.youtube.com/channel/UC6Vgiw_7TZrN7Lx2cFLA5eQ?view_as=subscriber

If you have some spare time, please check out my Youtube Channel: https://www.instagram.com/wildlifeoftheplanetmpc/?hl=hu

Thank you!

Wildlife photography preparation! 10 tips to take your wildlife photography to the next level!

Wildlife photography, like anything in life, can be a profession, can be a hobby, depends on how commited we are, how much time we want to sacrifice to learn, hwo much money we want to spend on it, and so on.

It depends what is our goal with this beautiful…well hobby(?). If we just want to go out there eventually, and click a few times, then go home and just check out the photos, put it in a folder on the computer, and then leave it there, we may won’t need that much knowledge about photography.

However, if someone wants to be a professional, there are many aspect and skill we have to develop in order to become a professional wildlife photographer!

One of the skills is the proper and high level preparation before we even thinking about push our button on the camera! This article is dedicated for this topic!

Let’s start!


1) PROTECTING OURSELFS AND OUR GEAR FROM THE ELEMENTS

We will come across with really extreme wheather conditions during our capturing sessions. We have to prepare for 40 degrees, and scorcher sun, if we travel to Africa for example. We also will face with chilling cold during a moose capturing trip in the swedish forests! We have to prepare for that conditions.

Proper clothing is a must.

Hat to protect yourself, raincoat against the rain, sometimes we even have to use mosquitio net in some places, otherwise they won’t leave us alone. For a colder wheather conditions, make sure we have layered clothing, with a good protection, and it is a must, that keep our ears and head warm, as these are our crucial part of our body, regarding for keeping our temperature normal! Some people like me, can’t exist without winter gloves, i warmly recommend to use, if you don’t want your fingers frozen in the swedish wild! There are special gloves out there made for wildlife photographers!

When we made sure, we will be fine, and protecting ourself properly, the next step is the gear!

Having a durable, waterproof camera backpack is essential. Increase our chances in the wild, if we are having a backpack with a colour which is not disturbing the wildlife. To protect our other equipments, i would strongly recommend to get a cover for your camera and lenses. It not just good against rain, but also will protect against dirt, mud, etc.

There are many protecting equipment out there, if you have the budget for it, i advice to buy them, they can save on your gear with them. It is still better to replace your cover, than your camera.


2) LEARN ABOUT THE ANIMALS YOU’RE CAPTURING

Duel beetween Elks

This is probably one of the most important on! Without this you won’t be able to find your subject, without help of course, and you won’t be able to get close to the animals, and get a better photo of them!

You must do your homework, do your research, spend some time before you go out there to capture them! You will learn about animal behaviour, find out where and what time you will have to get the best chance for a good photo.

There is a more practical way, which i support, big time, is to go out with local photographers and nature lovers, and learn from them, study the animals along with them! Practical learning is way better, as you may learn new skills, you would never learn from books!


3) PRACTICE WITH YOUR CAMERA

It should be a no-brainer, because we know, that id you put time in something, we eventually get better with it. That is more or less a fact. Obviously there are exceptions, but generally saying this is true.

Go out there, spend time to practice, click your camera, use different settings, experiment, what works for you what not. Enjoy it, have fun.

This is essential, because most of the time, you won’t have time to slowly set up everything, animals are not wating for you, you have to be on the top with your gear, and camera.


4) LOW-PROFILE, STAY AS LOW AS YOU CAN

This one is important, if you want to show more interesting perspective, more unique captures to your audience. Which ultimatelly is the case, we want people to admire our photos!

When we show different, not common perspective of life to people, they are always amazed by them, because these photos are different, show something new, and human love new, unexplored things to see, discover.

In order to capture this kind of photos, we have to find a different kind of perspective, we have to go low. Professionals saying, at least go down with your camera, to level the eye-level, but it is even better if you can go lower! This will bring the audience closer to the subject, will connect the people with your animal.


5) PATIENCE IS INEVITABLE

As a wildlife photographer, your images are predicated on the fact that things in nature are unpredictable. Anything can happen at any time…but most things happen only rarely, or at the very least, they rarely coincide with the exact time that you are in that specific spot. It is therefore imperative that you become patient…very patient.

Observing your subjects, getting to know their behavioural patterns, requires a great deal of patience. Often the implications are that you need to return to the same spot for days before things start to happen…

Don’t get into the habit of always looking into the viewfinder or the screen. The frame only shows you so much of what’s actually going on. Observe your surroundings with your bare eyes, so you can see everything better. Only look into the viewfinder only when you’re ready to shoot.


6) CHOOSING THE LOCATION

When searching for locations to photograph animals, wildlife parks are the best places to start. They typically offer a list of animals found on the premises, and many of them even show you exactly where and how you can find the animals.

Many of these parks are vast, so map out your desired locations for shooting, or you might end up getting lost. Once you get to your location, explore it first before setting up your equipment. Look for scenic areas and natural features such as mountains, trees, or flower fields you can incorporate into your photos.

Waiting for animals can take a long time, so you should also look for a spot where you can lie down safely and comfortably for hours. Since some of them come out during different times of the day, you need to get there before dawn and stay until dusk. There are a few questions here to consider, what we can use, to make sure, we set the best environment and options possible to ourselfs:

  1. How should you camouflage, and where should you position your camera?
  2. Where the lights and the wind comes from?
  3. Which lens?
  4. What’s the backgrounds like? Colours, texture?

7) KNOW YOUR SKILLS

Knowing our talent, and just knowing where we are with photography as gerenal is helps really a lot for us!

Recognise your weakest points of wildlife photography can help you develop. If you know you have to be better choosing your location, look for articles about it, ask other wildlife photographers, what their methods.

If you find hard handling your camera options, you might need to learn more about your gear. Thanks for the internet, and Youtube you can easily find videos about literally every camera or any gear you have.

Make sure you are aware of what is your level, and work on your weaknesses, to get better!


8) STUDY THE RULES BEFORE YOU GO TO YOUR LOCATION

After you decided, what is the location you would like to go, make sure you check all the rules and requirements you have to meet in order to take photos in that location. It can be some kind of restriction, or rules regarding safety.

The number one priority when wildlife photography shooting is safety. There is nothing more difficult than going to photograph animals after an accident.

When we talk about safety, we want to make sure you not only look after yourself. But also the subjects of your images. Anxious animals are dangerous.

The biggest tip here is to be mindful of your surroundings. Not only of the animals but the environment you are in. You could slip and fall in the middle of nowhere.

Being respectful to animals is not only an important rule, but it also provides many advantages.

It would be frustrating to find out that a spot is no longer accessible due to photographers who were not respectful.

Allow those who come after you to have the same photographic opportunities.


9) RELATION BETWEEN THE CONTENT AND THE TECHNICALS

Which one is a better photo? A lion captured in Africa, in thier natural habitat, laying on a rock or a squirell running with her small squirell baby on a tree in a park, in London, captured in a great angle with great settings?

Most people can say, well, the first one, that is a lion, very rare, wonderful animal, you can see squirells every day, but lion is a different level.

I would say i agree, but let’s just say something here. We can produce brilliant photos from the most common subjects like ducks, or squirells for example, and we can capture the most boring moments, with a really bad technicals of a lion. As a wildlife photographer, it is in our hand, that we able to show animals for the people, moments of their lifes, which is unique enough to make them forget, oh this is just a common duck, i can see them every day in the park.

So when you plan your trip, even it is just a local animal, try to see wildlife as a photographer, and keep in mind, not always the content wins your audience for you!

Try to get a good subject, content, and try to work on the best technical option possible!

Great advice to the discerning photographer would be to look for great opportunities regardless of species when the light is good!


10) APPLY RULES OF COMPOSITION, BUT FEEL FREE TO EXPERIMENT

Divide your frame into a grid like the one you see in the image above, then place your subject on one of the intersections to create balance in your photo. If you’re having a hard time imagining the lines, you can switch on the grids on your camera screen to help you compose.

A photo also generally looks better when you provide ample space where your subject’s head is pointed.

Additionally, in many cases, the environment is just as beautiful as the animals you photograph, so always incorporate it in your photos. Take your viewers on a journey and show them where your favorite creatures live and what it’s like to be there.


And just as general, don’t be afraid of experiment, maybe you will capture the most unique and amazing photo you have taken ever! Have fun and enjoy it!

If you have some spare time, please check out my Youtube Channel:

https://www.youtube.com/channel/UC6Vgiw_7TZrN7Lx2cFLA5eQ?view_as=subscriber

If you have some spare time, please check out my instagram:

https://www.instagram.com/wildlifeoftheplanetmpc/?hl=hu

Thank you!

Where can i capture Wild Boars in the UK with my camera?

Before i share with you this, i would like to ask you, two things:

  • Be really careful, wild boar’s are protecting their territory, therefore they can become aggressive, always keep distance if you taking photos, or make sure, you are in a safe place
  • NEVER disturb wildlife, during your capturing session, always make sure avoiding any interfere with wildlife and the environment, i say this here, because whenever we are taking photos of Wild Boar babies for example, they are easily can get distracted by human, and we MUST avoid any connection with them!

SO WHERE WE CAN FIND THEM AFTER ALL IN THE UK?

There are several confirmed breeding populations of wild boar in the UK.

In England they are established on the Kent/East Sussex border, in Dorset, in Devon and in Gloucestershire (Forest of Dean).

Animals from the latter site have crossed into Wales and become established in Monmouthshire.

Wild boar are also present in parts of South East and South West England, South East Wales and North West Scotland.

There is an estimated of 2600 wild boar out there, which is a very low number, therefore it can be a nice challenge, to capture them with your camera!

I personally love this kind of challenges, i will definietelly visit later this year to the forest of Dean, where the largest population is living and breeding!

I hope i can help with this article!

If you have some spare time, please check out my instagram:

https://www.instagram.com/wildlifeoftheplanetmpc/?hl=hu

Thank you!

I want to capture a rare capercaillie in Scotland this year!

So i am kind of going crazy for rare animals, and the capercaillie is one of the rarest birds in the UK.

Besides the Red Squirell, this species is on my list also to capture this year with my camera!

What is the Capercaillie and where to find it?

The male capercaillie

A large grouse around the same size as a turkey, the male capercaillie is predominantly black and brown, with a red wattle above its eye, whereas the female has barred brown-grey colouring.

They feed on vegetation and inhabit native pine forests in Scotland.

A mixture of clearings, mature trees and natural forest regeneration is important for sufficient food resources, shelter and open areas where the ‘lek’ (when males attract females and fight rivals) can take place in spring.

I would like to capture one of this rival fighting with my camera!

Capercaillie were extinct in the UK in the 18th century, until Swedish birds were reintroduced to Scotland during the 1830s.

However, the species has now declined rapidly, with an estimated figure of less than 2,000 birds left.

This is due to habitat loss, caused by destruction or overgrazing. In trying to prevent deer overgrazing, fences have been erected but some birds may collide with these, causing death.

With increased understanding, forests can be managed to favour capercaillie, although the threats continue for this UK Red List species.

So my way will lead into the pinewoods of northern Scotland this spring, to the suitable forest habitat in Badenoch and Strathspey!

I hope i will succeed, and if so i will share my experiences here, well, i will share them anyway, but yes! Fingers crossed!

In the meantime, check out my instagram:

https://www.instagram.com/wildlifeoftheplanetmpc/?hl=hu

Thank you!