How to self-critique in wildlife photography? Why is it so important?

This topic is really important, and without knowing it and practice it properly we won’t be successful in wildlife photography.

Speaking about self-critique is essential, not just in wildlife photography, but in life general. In order to do it correctly, we need to learn how to practice it, and then do it, every time when we go out there and photographing animals.

I came across people on Instagram, who asking for feature, with poor quality photos, and when I talk with them, it seems they can’t realise that the photos are just not good enough. Now, I don’t want to go in to psychological theories, I will keep it simple, they does not have self-critique at all, or just not aware what is a good standard for wildlife photography.

Either way, it will be an obstacle for them, to be able to develop with their skills and knowledge.


HOW TO CRITIQUE A WILDLIFE IMAGE?

In order to be able to reflect our work, photos, we have to learn how to critique as general. What to look for, how to approach an image, how to compare and evaluate.

I recommend to you after you read this article, check out some photos on Instagram, or some wildlife photographer’s portfolio, and try to critique the images, practice it. It will help when it comes to your images. I have to mention here, that obviously when we are talking about our images, we can be a bit more biased, but we have to recognise it, and try to approach our photos with a neutral way.

SHARPNESS

Now, generally speaking the sharpness of our image can determine the photo. If your images are only ever seen as relatively small web images, then this element may not be important to you. However, if you will publish your image, or it will be printed, then you must consider sharpness.

To keep it simple, when talking about sharpness, it refers to an image’s overall clarity in terms of both focus and contrast. When the subject of an image is sharp, the image appears clear and lifelike, with detail, contrast and texture rendered in high detail.

DEPTH OF FIELD

A good depth of field will immediately grab your attention, and guide your eyes to the focus of the image. Obviously, with different subject animals, the focus of the image can be different, generally speaking we want our focus on the eyes, when we shooting birds with our camera for example, but we might want the focus on the skin of a reptile, that can be another case.

To be able to evaluate, I approach the images with a two-step system. First is the first impression, how the image engages me. And second is, where I study the depth of field more detailed. At this point I can evaluate clearly if the depth of field is appropriate or not.

COMPOSITION

This factor can take a whole article, however I will only speak about some guidelines in this one, and the main and key moments of approaching a wildlife image when it comes to critique in terms of composition!

First of all, if composition sounds easy for you, than you should think about it again. Obviously we can argue, what level of photography we speak about. I, personally like to speak about every article, the highest level possibly, but keep it appropriate and understandable for everybody. For a great composition, we will need a lot of preparation, fieldwork, and a bit of luck also! But, how to evaluate a good composition.

I will talk two factor here, one is the subject placement, and the other is the framing. Where you positioning your desired animal on the photo is basically the subject placement, sometimes you have a lot of room to play with, sometimes you are restricted.

The framing is a bit more easier, knowing that in post-processing you can crop your image if you wish. Try to compose your image, where you don’t end up too much unnecessary background, if you ended up with it, than just crop it properly after! Learning to frame a compelling composition takes time and understanding. We must invest the time to really understand the guideline of thirds, colour, leading lines, etc. Both study books and practice some fieldcraft is important.


SELF-CRITIQUE IN WILDLIFE PHOTOGRAPHY?

Self-critique is essential, and part of the learning process. Or at least should be a part of it. Reviewing your photos and your work, and learning from the review as general will make you better wildlife photographer.

To be able to understand the standard of a good photo will also increase your confident, because you will understand what is missing from your images, but you will know the way how to improve, how to get there. Knowing the route to photograph better images will always give you more confidence!

The process of practicing self-critique is obviously can be different and will be person by person, different habits, personalities. It is a journey to learn your own method, but I try to help with some guidelines here.

The process can start at home, with the preparation. Well, it should be anyway. Getting ready and prepare for wildlife photography is as important as the shooting itself. I won’t be writing about fieldcraft and other factors here, let’s jump to the time, where you are sitting front of your computer, and try to review your image.

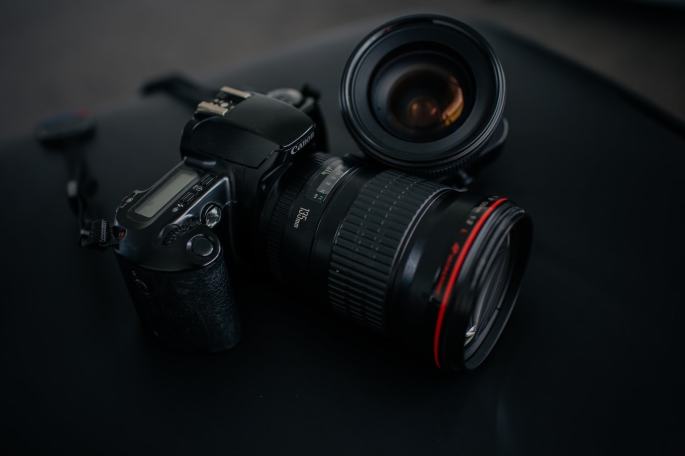
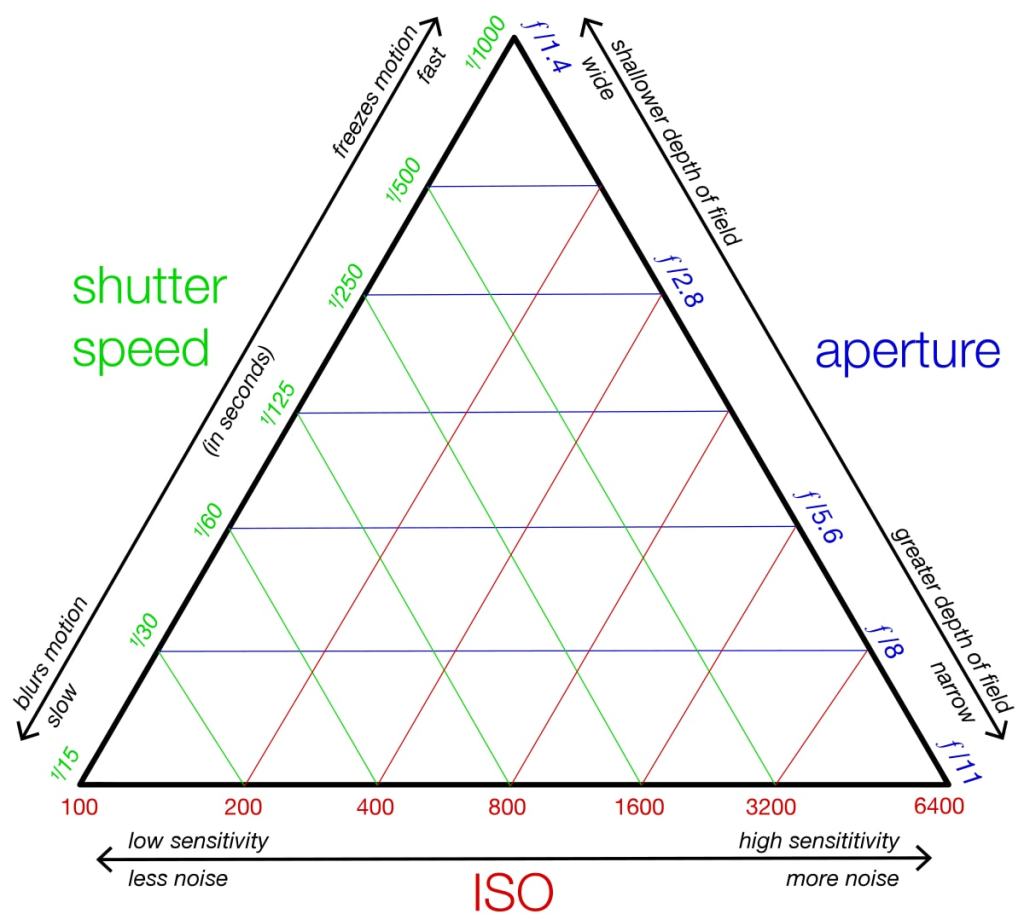
Now, in order to do your review properly, you should have the knowledge what to check on your images, and you should be able to see also what camera settings you should change for next time. You will be able to consider if you should have used different shutter speed, aperture or ISO after some practice.

Checking if the background have been chosen properly, is it distracting, is it taking out the focus from your subject. If so, you should choose a better, less distracting background next time. It is also true for the foreground if you have on your image.

Lighting can play a big part on the review process, is the image too bright or too dark? You might consider the position of the sun, where the light comes from, just evaluate basically the settings of your image in terms of lighting.


CONCLUSION

Now, obviously this is just my method, or system, on how to evaluate an image, and how to self-critique, there is no yes and no, everybody can create an own system, and use that one.

This article is created to help to understand the importance of self-critique, and give guidelines how to do it properly.

The most important thing is, that after every photographing session do a review, and keep in mind what can you do better next time. I promise, you will develop in wildlife photography after every session.

I hope I could help with this article!

If you have some spare time, please check out my Youtube Channel: https://www.youtube.com/channel/UC6Vgiw_7TZrN7Lx2cFLA5eQ?view_as=subscriber

If you have some spare time, please check out my Instagram: https://www.instagram.com/wildlifeoftheplanetmpc/?hl=hu

Thank you!

Camera settings, part 3: Aperture in wildlife photography

After writing about the importance of ISO and shutter speed, we finally arrived to the third pillar of settings, which is the aperture! With this three article, we should understand the relation of this three settings, and how they are working!

THE RELATION BETWEEN ISO, SHUTTER SPEED AND APERTURE

The triangle

WHAT IS APERTURE?

Aperture is the setting, which controls, how much your camera lens is opened or closed. It is either widen the opening or narrow it down, depends on the value of the aperture!

As a result, you will be able to actually control with this that, how much light can enter into your camera. With the Aperture Priority mode on your camera, you can adjust this manually!


THE VALUES OF APERTURE

The value is given with f-numbers, like f/2, f/4 and so on. Between the numbers and the state of the opening has an inverse relation, it means, that as we increase the f-number, the opening will narrow down.

Usually the maximum aperture is f/1.4(widest opening), and the minimum is f/22(smallest opening or most narrow).


WHAT IS THE INFLUENCE OF APERTURE ON YOUR FINAL IMAGE?

A higher aperture(smaller opening) will result a larger depth of field(larger area of focus), till the smaller aperture will result a smaller depth of field.

WHAT IS DEPTH OF FIELD?

To be completely honest, when I studied aperture, it wasn’t that straightforward for me, what is exactly depth of field. In case someone else is struggling with it also, I will try to explain it as simple as I can!

Depth of field refers to the distance between the closest and the farthest objects in a photo that appears acceptably sharp. Generally, a large aperture results in a large amount of foreground and background blur, yielding shallow depth of field. On the other hand, a small aperture results in small amount of foreground and background blur, yielding wide depth of field.


CHOOSING THE “RIGHT” APERTURE FOR WILDLIFE PHOTOGRAPHY

There are a lot of opinions existing regarding the right aperture for wildlife photography, however, like a lot of other things in photography, it can be very subjective. I will try to give some basic guidelines here, but I encourage everybody to practice, and try out what is working for them and what is not.

Now, with fast-moving animals, in order to capture them properly with your camera, generally speaking you will need wider aperture. It can also provide a really diffused background!

What is often missed and overlooked about using a wide aperture though, is the issue of key elements of an animal’s body being out of focus due to the shallow depth of field.

To understand this, I will try to give you an example here. Imagine, we want to photograph a bird, for a portrait. We are focusing on the eyes, which will be really sharp, however the beak will be out of focus. It is because the depth of field is too small, therefore using a smaller aperture in this case would result a better image! With portraits, it is important, that the whole head is sharp, so choose the correct aperture setting carefully knowing this!

Also, keep in mind, that the closer your subject to the camera, the smaller the depth of field will be!

When we are preparing our camera settings, we should start from the widest aperture possible, and adjust from there, if we need for our wildlife photography!


WHEN WE SHOULD USE APERTURE PRIORITY MODE?

Now, generally speaking, the best time using aperture priority mode, if we one, not really familiar with our camera settings yet, or two, we are photographing in a really fast-changing environment, in terms of lighting!

Aperture priority is a good choice, when you are capturing birds flying around with your camera.


COMBINING THE THREE PILLAR SETTINGS TOGETHER

Now, lot of camera is coming with Auto Mode, where the camera will set up the ISO, shutter speed and the aperture automatically. In order to photograph wildlife on a higher level, we should know how to adjust these settings in relation with each other.

Whenever you press your shutter button, the light will enter into your camera, then it goes through the aperture hole. Once the light goes past the lens aperture, it then hits the shutter curtain, which is like a window that is closed at all times, but opens when needed. The shutter then opens in a matter of milliseconds, letting the light hit the camera sensor for a specified amount of time. Now, after this, the sensor gathers the light, and your ISO brightens the image if necessary (it will also result grainy and lower quality images sometimes, so be careful). Then the shutter closes and the light is completely blocked from reaching the camera sensor.

In bright conditions when lots of light can enter in the lens, with a very small lens aperture, we would need more time, i.e. longer shutter speed for the sensor to gather enough light to produce a properly exposed image.

What would happen if the lens aperture/hole was very big? Obviously, a lot more light would hit the sensor, so we would need a much shorter shutter speed for the image to get properly exposed.

These are just a few examples, obviously a lot more scenario exists, this is the beauty of wildlife photography! In nature, with many different environment and animals, we will find ourselves in so many different situations, we should make sure we are prepared and ready!


CONCLUSION

If you read the first and the second part, you should start to see the relations between the settings. With the guidelines I am sharing here and the necessary practice, we should be able to develop with our wildlife photography in a short period of time!

Just knowing this three settings will increase your chances for better images, mastering them is essential in order to become a good wildlife photographer. Obviously, on your journey, you will find your best settings, which works best for you and with you.

Experiment if you would like, feel free to try out different options, with keeping the basic knowledge in mind!

I hope I could help with this article, if you wanted to know more about aperture, or you are new in wildlife photography! Enjoy!

If you have some spare time, please check out my Youtube Channel: https://www.youtube.com/channel/UC6Vgiw_7TZrN7Lx2cFLA5eQ?view_as=subscriber

If you have some spare time, please check out my Instagram: https://www.instagram.com/wildlifeoftheplanetmpc/?hl=hu

Thank you!

Choosing the best tripod for wildlife photography in 2020

To start wildlife photography, we don’t really need a lot of equipment, basically only a camera and a good lens. Hand holding longer lenses can work for birds, but even that, after a while, our muscles will run out of energy, and we won’t be able to photograph properly anymore. Now, obviously as we get better we may discover more aspect of wildlife photography, where other equipment will come in picture, like the tripods. This equipment will be our topic in this article!


WHAT KIND OF TRIPOD SHOULD I BUY?

Like any other equipment, we should know what is our purpose with the tripod, when and where we want to use it, what is our budget or which fits the best for your camera. When we answered all these questions, we can start to think about buying a tripod!

Nowadays we have basically unlimited options for tripods,and it is even harder to choose the right one!

WEIGHT

Now, sounds trivial, however, it can be a complex question. If we are planning to photograph birds in our garden, or just the local forest and not going to carry the tripod that much, we might don’t even need to consider the weight, fairly, carry the tripod in the garden is not a big deal in my opinion!

However, if we are going abroad for example, for an African safari, we have to really consider how heavy is our tripod! Carrying a really heavy tripod on a two weeks long safari can be a nightmare!

Tripods can weight from 1 pound up to even 6. Nowadays tripods are aluminium or carbon fiber. Aluminium ones are heavier but cheaper and more ideal for high-wind environments, carbon fiber ones are lighter but more expensive and sometimes lack of stability in really windy environments! It is always a trade-off, decide wisely!

TYPE OF HEAD

Whenever you buy a tripod, most of the times it will come with a standard head, which you might want to change it over time, or even straight away! There are a lot of different variation for the head, for different use.

You can choose a pan-tilt head, these head will allow a more precise positioning, but I would not use for moving animals.

For that, I would recommend a head called a gimbal head. It will allow more movement of the head, so you can photograph flying birds or quickly moving animals for example.

HEIGHT

Before you buy a tripod, check what is the fully extended height of the tripod. Most people assume that if the tripod fits to the eye level on a flat ground, it will fit in the wilderness. Well, it won’t. When have you ever found flat ground outside? Right? In reality you’ll want to have the ability to have have one downhill leg extend longer and still have the camera at eye level.

Try to buy tripods which is generally speaking tall, and you can adjust it in relation with the ground in the wild! Choosing one that’s the right height will also allow you to easily look through the viewfinder, without having to hunch over –or stand on a log!

STABILITY

Stability is a key attribute, if we want to keep our camera and lens safe, nothing is more painful than seeing your camera or lens getting damaged, because of a low quality tripod with a bad stability. The more compact ones are probably will be more expensive, but it is true for most of the equipment as general!

FOLDED LENGTH

This one is only important if you want to save some space whenever you are packing, or you need to be careful with the size for some reason. Most of the brands are mark the folded size, so you can check it before you buy!


WHAT IS THE GIMBAL?

A gimbal is a device that sits on top of your tripod and perfectly balances your camera and lens combination, allowing you to pan and tilt it in any direction with almost zero effort. For wildlife photography with any lens of 400mm or more, I would consider this an essential item. Ball heads are designed to be positioned and then locked for the photo, but when shooting wildlife you are often following your subject and a gimbal makes this much easier.


CHOOSING TRIPOD HEAD FOR WILDLIFE PHOTOGRAPHY

As I mentioned above, tripods are sometimes comes with a head, but we can replace them for a better one, or a one which support our photography in a more appropriate way!

BALL HEAD

These are one of the most common types of tripod head. They are quick and easy to adjust, allowing you to manouvre the camera into almost any position at a moment’s notice. Ball heads are best used with lighter combinations of equipment, so they aren’t going to be suitable for a long telephoto lens.

They aren’t very precise when it comes to adjusting their position. When you unlock the ball, you’re moving it around completely and not just on one angle or plane. This can be particularly annoying if you’ve spent time leveling it perfectly and only want to adjust it in one direction.

PAN-TILT HEADS

Pan-Tilt heads are a very popular choice amongst photographers. They allow for more precise adjustments of your camera’s positioning, providing separate knobs for different planes (vertical, horizontal and tilting action). Unlocking each knob allows you to adjust the respective plane, before then locking it into position again.

GEARED HEADS

Similar to the pan-tilt heads, but geared heads instead make their adjustments by turning the handles. This allows for incredibly fine adjustments to the positioning, but it is much slower to use.

FLUID HEADS

Fluid heads use a sealed liquid to create a smooth motion during panning and other movement. They are essential for those dedicated to shooting video footage, rather than stills photography. Fluid heads are excellent for creating smooth start and stop motions during panning sequences.

PISTOL GRIP HEADS

Pistol grip heads are very similar to ball heads in their movement, except that you squeeze the handle to unlock the head and make your adjustments. They’re very quick to adjust, but they can be awkward to use as moving whilst simultaneously focusing the camera and taking images is not always possible.

Question is which one we should use than. If you’re a wildlife photographer using a long lens, then gimbal head should be your choice. They are more expensive, but buying a gimbal head will support your photography the most if you capture wildlife with your camera.


RECOMMENDED TRIPODS

First of all, when I started wildlife photography, I was always looking for the price at first, I had a low budget, and starting a new hobby, is always something we don’t want to spend a lot on, at least at the beginning.

There are a few great brands I would recommend. These are:

  • Manfrotto
  • Benro
  • Vanguard
  • Gitzo

KEH Camera is a great choice, their prices are really good in my opinion, compare with others, they sell used gears with great condition, also they are offering deals and coupons time to time!

Check them out if you like:

Shop KEH – the world’s largest pre-owned camera store! Shop Newly Arrived Items at KEH today!

If you are more of an Amazon fan, I have my recommended tripods and tripod heads here:

Amazon Recommended tripods and heads


CONCLUSION

The idea is to understand our needs, and when we know what it is, we can buy the proper tripod and head for our wildlife photography experience! Choosing a cheap one, is not always an option, be wise when it comes to buying them. Hope I could help with the process with this article!

If you have some spare time, please check out my Youtube Channel: https://www.youtube.com/channel/UC6Vgiw_7TZrN7Lx2cFLA5eQ?view_as=subscriber

If you have some spare time, please check out my Instagram: https://www.instagram.com/wildlifeoftheplanetmpc/?hl=hu

Thank you!

Why India is a paradise for wildlife photography?

Majestic

One of the greatest place for wildlife photography in Asia, is India. Lots of opportunity, lots of wildlife, one of a lifetime experience! But why?

This is what I will be writing about in this article!

Let’s start!


WILDLIFE OF INDIA

India’s geography is one of the most diverse on the planet. It is a hotspot for biodiversity with its various ecosystems ranging from the Himalayas in the north to the evergreen rain-forest of the south, the desert sands of the west to the marshy mangroves of the east. India is home to about 7.6% of all mammalian, 14.7% of all amphibians,6% of avian (bird), 6.2% of reptilian, and 6.0% of flowering plant species. India’s forest lands nurture about 500 species of mammals and 2000+ species of birds. This richness in Indian wildlife has been celebrated since time immemorable. As a result, four of India’s national symbols display India’s mammals.

India is the only country in the world where lions and tigers coexist in the wild. It has the largest deer as well as tiger population. Indigenous to the subcontinent are the unique species such as the Indian Sloth Bear, the Chausinga antelope and the majestic Barasinga. It is home to Bengal and Indochinese tiger, Asiatic lions, Indian and Indochinese leopards, snow leopards, clouded leopards, various species of Deer, including Chital, Hangul, Barasingha; the Indian Elephant, the Great Indian Rhinoceros, and many others. The region’s diverse wildlife is preserved in more than 103 national parks, 18 Bio-reserves and more than 535 wildlife sanctuaries across the country. Wildlife management is essential to preserve the rare and endangered endemic species.

FAUNA

India is home to several well-known large animals , including the Asian elephants, Bengal and Indochinese Tigers, Asiatic lions, Snow leopards, Clouded leopards, Indian leopards, Indian sloth bear and Indian rhinoceros. Some other well-known large Indian mammals are: ungulates such as the rare wild Asian water buffalo, common domestic Asian water buffalo, gail, gaur, and several species of deer and antelope. Some members of the dog family, such as the Indian wolf, Bengal fox and golden jackal, and the dhole or wild dogs are also widely distributed. However, the dhole, also known as the whistling hunter, is the most endangered top Indian carnivore, and the Himalayan wolf is now a critically endangered species endemic to India. It is also home to the striped hyena, macaques, langur and mongoose species. India is home to 70 percent of the world’s total tiger population.

Now, after all this, it is easy to say, that a trip to India will give us one of the most amazing experience in terms of wildlife photography!


ETHICS, STANDARDS, BEHAVING AS A WILDLIFE PHOTOGRAPHER

Now, this topic is a sensitive topic, but for me there is not really negotiable. It is a universal rule for me, that wildlife is ALWAYS come first, RESPECT is essential, and keeping in mind the wildlife’s well-being is the most important during wildlife photography!

Why I mention this here? Well, unfortunately lot of people take advantage on this beautiful fauna, without bearing in mind the well-being of wildlife. Being disrespectful, and sometimes even harm the subject animal for a good photo is a huge NO from me!

It is a shame, but it is happening, and I encourage all wildlife photographer to not taking part any of this workshops or events!

Please note, it is not happening only in India, but in this article i am writing about India, so i wanted to mention this issue here!

The idea of this note is not to point fingers at someone but to tell new peer photographers, that perfect photograph at the cost disturbing the wildlife means nothing. Try to enjoy the wildlife and understand their behaviour, when the opportunity presents photograph them. It is NOT normal to handle snakes/other species with no proper training or experience. It is NOT normal to torture a subject to get an aggressive frame. It is definitely NOT okay to removing from their habitat and placing in a photogenic place so your photograph looks beautiful. It is called wildlife, sometimes the image is going to be cluttered, ACCEPT IT. Observe them, the opportunities will present themselves. Just because you saw someone do it, you don’t have to do the same.


RARE ANIMALS OF INDIA

Rare endemic monkey in India

If you read a few of my other articles, you should know now, I am a fan of rare animal photography, I look for it, as a challenge. Finding those animals, and capturing them with my camera is makes me excited, and the result is always really satisfying!

RED PANDA

The beautiful and endangered species,Indian Red Panda is also known by the name of Red Fox. From the two kinds of Red Pandas in the world, only one variety is found in India. The small arboreal mammal Red Panda is native to the eastern Himalayas. India has 20 protected areas with Sikkim, Arunachal Pradesh and West Bengal’s Khangchendzonga and Namdapha National Park. Only 300 species are living in India, 10000 all together on the planet!

BROWN PALM CIVET

The Palm civets is endemic to the rain forests of Western Ghat in India. The species of civet has a coat that is a golden brown, dark brown and orange-brown to gray. The Brown Palm Civet is a fruit eater and an important seed dispersing agent of rain forest. The very graceful climber rest during the day in hollow trees canopy vine tangles, Indian giant squirrel nests and forks of branches. Another species of rare civet found in Western Ghat is a critically endangered, the Malabar Large-spotted Civet. Because of a well-managed conservation work, the numbers are increasing. Hopefully it will continue this trend in the future!

FLYING SQUIRELL

The Giant Indian Flying Squirrel is a critically endangered species due to loss of habitat and prey. Its known habitat are Namdapha national park, tall Mesua ferrea jungles and area of Noa Dihing river in North eastern India. The Namdapha Flying Squirrel is similar to other flying squirrels except of the color and other features. Another rare species of squirrel in India is giant squirrel of Malabar, The Indian giant squirrel, Ratufa indica is the largest squirrel in the world and is considered as one of the endangered species of squirrel in India.

NILGIRI TAHR

The Nilgiri Tahrs are stocky goats with short, coarse fur and a bristly mane,is a native to the Nilgiri Hills and Western Ghats. These tahrs inhabit the open montane grassland habitat of the South Western Ghats rain forests and dense forests at the lower elevations of Anamalai Hills. Eravikulam National Park is home to the largest population of Nilgiri Tahr,The state animal of Tamil Nadu. A small density is also spotted in Periyar National Park, Palni Hills and other pockets in the Western Ghats, Kerala.

INDIAN FRUIT BAT

The Greater Indian Fruit Bat also called as Indian flying fox is the largest bat in the world, with a wingspan of 1.2 and 1.5 meters. Giant Indian flying fox eats only fruit like mangoes and bananas, The giant bat of India lives in colonies with few hundred bat in deep forests of Western Ghats. The Salim Ali Bird Sanctuary of Kerala and Goa are home for the endangered species of Indian flying fox. There are two species of fruit bats found in India.


BEST PLACES FOR WILDLIFE PHOTOGRAPHY IN INDIA

CORBETT NATIONAL PARK

Located in Uttarakhand, this park is famous for photographing large carnivorous mammals. Jeep safari is opted for entering to the inner zones of the parks to spot large mammals in their own environment. There are five different zones, which are filled with different set of animals and birds. Choose the zone based on the season and the type of animals you are looking for. The Himalayan foothill backdrop provides more beauty to the photographs. You can find many species and interesting animals to photography in this park. 

DACHIGAM NATIONAL PARK

Located in Kashmir, this park is iconic for beautiful photographs. This is the right place to photograph rare animals like Kashmiri stag, Himalayan black bear, musk deer and others. You can spot many beautiful and rare birds in this park if you visit early in the morning. You can find rare insects too in this region.

DUDHWA NATIONAL PARK

This is an ecosystem park located in Uttar Pradesh. Located on the Indo-Nepal border, you can find diversity of animals to photograph. Starting from the one-horned rhino to the hog deer, you can find an array of animals. If you visit during spring or winter, you can spot many local or migration birds. The park has a clear climate throughout the year making it easier to photograph animals in low light too.

HEMIS NATIONAL PARK

This park located in Ladakh is attracting thousands of professional wildlife photographer for photographing snow leopards (only 500 species are living in India). It is a ferocious animal and only avid photographers with the help of the most-experienced guides choose this expenditure. The park includes the spot of fusion of Zanskar river with Indus River. This region is rich with fauna and flora. You can spot many interesting animals and birds in this region.

Beautiful snow leopard

GREAT HIMALAYAN NATIONAL PARK

This park is the basic park for any wildlife photographer in Kullu in the state of Himachal Pardesh. You can find all cliché wildlife elements that are essential for a photographic tour. This park holds a brilliant collection of exotic animals that are confined to the Himalayan ecosystem. You can find many valleys, which are rich with herbivorous herds with exotic flora background. You can find many rare environmental sceneries to click time-perfected pictures.

RANTHAMBORE NATIONAL PARK

This park of Rajasthan has its place in many luxury train trips and numerous wildlife tour packages. The most commonly sought animal for photography is the elegant Bengal tiger with cubs. Bengal tigress, Machhli is fond of posing for the photographers. This is the right park for click pictures of dangerous carnivorous animals. Jeep safari to the deepest part of the park is very crucial for spotting tigers.

GIR NATIONAL PARK

If you are looking for rare carnivorous for capturing, the best park to visit is Gir of Gujarat. This park is home to the lions. You can also spot 300 different birds and many interesting migration birds in this park. The water region is famous for photographing crocodiles and fishes.

TADOBA NATIONAL PARK

This park is located in Chandrapur region of Maharashtra. This park has its own share of tigers making spotting tigers more common here. With elephant rides, you can get as close as possible to the carnivorous without worrying about your safety. The flora of this region provides a good backdrop your photograph. The only problem is the misty climatic condition, which requires the photographers to visit in the morning for perfect pictures.

SIMLIPAL NATIONAL PARK

Wildlife photography is not just about large mammals and ferocious animals. It is also about clicking small animals that are easy to miss. Flying squirrels, dancing peacocks, mynah and other small animals are commonly found in Simlipal park of Odisha. You can also spot large mammals like elephants, antelopes, tigers and others.


TALENTED INDIAN WILDLIFE PHOTOGRAPHERS

With the amazing fauna in India the local photographers has the perfect opportunity to get the most out of their photography experience! Lot of people starts this beautiful hobby(?) day by day, and exploring the wildlife of India with their camera! Let’s see a few Indian people, who already achieved some success in wildlife photography!

Check them out, it is worth to study their work!

  • Rathika Ramasamy – DD National has featured Rathika as the first woman wildlife photographer in India. Her instagram: https://www.instagram.com/rathikaramasamy/
  • Jayanth Sharma – He is best known for combining elements of nature with those of fine art and portraying them through innovative perspectives. His instagram: https://www.instagram.com/jayanth_sharma/
  • Kalyan Verma – Kalyan Verma is a wildlife photographer, filmmaker, naturalist and explorer specializing in environment, science and ecology in India. His instagram: https://www.instagram.com/kalyanvarma/
  • Sandesh Kadur – Sandesh Kadur’s first interaction with wildlife photography happened at a relatively young age, when his father gifted him an SLR and a number of Nation Geographic films for his birthday. His instagram: https://www.instagram.com/sandesh_kadur/
  • Shekar Dattatri – Shekar Dattatri was enthralled by wildlife from the age of 13, which is when he joined the Madras Snake Park as a student volunteer. His website: http://www.shekardattatri.com/
  • Sudhir Shivaram – Sudhir Shivaram is a native of Karnataka. His journey in wildlife photography began in the year 1993 when he left his job as an engineer to pursue photography full-time. His instragram: https://www.instagram.com/sudhirshivaram/
  • Sunjoy Monga – Born in Mumbai, Sunjoy’s love affair with wildlife began at a very young age. His instagram: https://www.instagram.com/sunjoymonga/
  • Shaaz Jung – Shaaz Jung is a naturalist, big cat tracker, professional wildlife photographer and cinematographer. His instagram: https://www.instagram.com/shaazjung/

RECOMMENDED COMPANIES WHO OFFER WILDLIFE PHOTOGRAPHY TRIPS IN INDIA

WILDLIFE PHOTOGRAPHY INDIA – Loads of option, great value

TRAVELOGY INDIA – Good prices, experience guide

WILDLIFE WORLDWIDE – So many different tour, specific trips, like Red Panda workshops or trips specialised for photographers who wants to capture tigers with their camera


CONCLUSION

Now, with the fauna and its uniqueness, India is one of the best places in Asia for wildlife photographers, and it is not a question, it can be a lifetime experience. I would like to mention it again, that making sure we are joining tours where the RESPECT and the WELL-BEING of the wilderness is the first, and photography is just a result of the trip, not the purpose! This is my opinion, I hope lot of people shares this idea! Choose well, and enjoy the wildlife in India! Have fun!

I hope I could help with this article, if you are planning to visit India, or thinking about it!

If you have some spare time, please check out my Youtube Channel: https://www.youtube.com/channel/UC6Vgiw_7TZrN7Lx2cFLA5eQ?view_as=subscriber

If you have some spare time, please check out my Instagram: https://www.instagram.com/wildlifeoftheplanetmpc/?hl=hu

Thank you!

What type of knowledge should I have in order to be a better wildlife photographer?

Adult lion with his cub

This article is really important in order to get the most out of our photography experience. I am not going to talk about camera settings, how to set up your tripod properly, or any other technical aspect of wildlife photography. I am going to talk about knowledge outside of the technical part, which will be increasing your chances to capture your desired subject with a camera, and get better photos as general!


WHAT KNOWLEDGE SHOULD I HAVE FOR WILDLIFE PHOTOGRAPHY?

Now, if you already read few of my other articles, you should know, that preparation before you get out the the wilderness is essential. I will talk about this in more detail, and I would like to point it out why are those information and knowledge can help you to become a better wildlife photographer.

You can either learn this knowledge by yourself, online or from books, attend in courses or even go to university to study, obviously depending on your budget, time and dedication!

Let’s see now after this long prelude!


STUDY ANIMAL BEHAVIOUR

I am currently studying at a free online course, when i have the time. Animal behaviour is a branch of science, about wild, domestic and captive animals everyday life behaviour. If you learn this topic, you will be able to understand the “how” and “why” of the animals natural behaviour, ow current and past environments and ecology influence behaviour, how behaviour is shaped by underlying gene-environment interactions, and why we see variation among individuals, species and species groups.

How knowledge of animal behaviour can help my wildlife photography?

Understanding this topic is clearly will help, you will be able to choose when to get to the place where you are planning to capture your desired animal. For example, if you know the natural behaviour of a deer, when it’s active, then you can plan with it, and with this knowledge you will be able to increasing your chances for a great photo!

With animal behaviour studies you will also learn:

  • Types of foraging
  • Camouflage and mimicry
  • Trade-off and co-evolution
  • Steps involved in studying behaviour
  • Observing and recording animal behaviour
  • The risk of anthropomorphism
  • Using video and online resources in behaviour research
  • Finding and understanding scientific papers

And so much more. I should mention, that without this knowledge you will be able to capture the wildlife, and get great photos, however everything you learn, it will help, and developing as a wildlife photographer will result greater images from your desired subject!


STUDY ZOOLOGY

Zoology is the branch of biology that studies the animal kingdom, including the structure, embryology, evolution, classification, habits, and distribution of all animals, both living and extinct, and how they interact with their ecosystems. The above mentioned animal behaviour is a sub-disciplines of zoology, but i wanted to talk about separately, because that is probably the most useful topic for wildlife photography!

Gradually zoology expanded beyond Huxley’s comparative anatomy to include the following sub-disciplines:

  • Zoography, also known as descriptive zoology, is the applied science of describing animals and their habitats
  • Comparative anatomy studies the structure of animals
  • Animal physiology
  • Behavioral ecology
  • Ethology studies animal behavior
  • Invertebrate zoology
  • Vertebrate zoology
  • Soil zoology
  • The various taxonomically oriented disciplines such as mammalogy, biological anthropology, herpetology, ornithology, ichthyology, and entomology identify and classify species and study the structures and mechanisms specific to those groups.

How knowledge of zoology can help my wildlife photography?

Knowing the history of your subject animal, learning when they are living, how they are reacting to each other, when they are mating and breeding is all great and useful things to know. With studying zoology you will be touching all this subjects, and it will gradually increase your success in wildlife photography.


STUDY BIOLOGY

Now, this subject is probably the one, every wildlife photographer has at least a little knowledge about. Simple because in most of the countries they study in elementary, secondary or even in high school! Now that is only a small piece of the cake! Biology is a huge topic, and we can spend years to learn if we wish!

Biology is the natural science that studies life and living organisms, including their physical structure, chemical processes, molecular interactions, physiological mechanisms, development and evolution. Despite the complexity of the science, there are certain unifying concepts that consolidate it into a single, coherent field. Biology recognizes the cell as the basic unit of life, genes as the basic unit of heredity, and evolution as the engine that propels the creation and extinction of species. Living organisms are open systems that survive by transforming energy and decreasing their local entropy to maintain a stable and vital condition defined as homeostasis.

Sub-disciplines of biology are defined by the research methods employed and the kind of system studied: theoretical biology uses mathematical methods to formulate quantitative models while experimental biology performs empirical experiments to test the validity of proposed theories and understand the mechanisms underlying life and how it appeared and evolved from non-living matter about 4 billion years ago through a gradual increase in the complexity of the system.

How knowledge of biology can help my wildlife photography?

As I mentioned above, biology is an enormous topic, and we probably won’t need to know a lot of topics in order to be better in wildlife photography. However, knowing some of the animals genetics or environmental attributes for example helps us understanding the animals better, therefore it is increasing our chances of success!


Giraffe mom and kid

ECOLOGY AND CONSERVATION

Ecology is a branch of biology concerning interactions among organisms and their biophysical environment, which includes both biotic and abiotic components. Topics of interest include the biodiversity, distribution, biomass, and populations of organisms, as well as cooperation and competition within and between species. Ecosystems are dynamically interacting systems of organisms, the communities they make up, and the non-living components of their environment. Ecosystem processes, such as primary production, pedogenesis, nutrient cycling, and niche construction, regulate the flux of energy and matter through an environment. These processes are sustained by organisms with specific life history traits.

How knowledge of ecology and conservation can help my wildlife photography?

Now, that is another great subject to study if we want to develop in wildlife photography. Knowing the dynamics between species, or having the knowledge of the hierarchy of different birds(capercaillie for example) can highly increase our chances in photography, simply because we know what to expect, and we know what is going to happen most of the time out there, therefore we can be ready with our camera, and shoot with it at the perfect moment!

On the other hand conservation will help us understand the fragility of the animal eco-system, and we get the knowledge of how we can help protect the animals during our wildlife photography sessions. This is essential, animals first, photography second! Respect the wilderness, and it will respect you!

FEW MORE USEFUL TOPIC

  • Geography 
  • Art history 
  • Anthropology
  • Film studies 
  • Psychology of animals
  • Sociology
  • Animal ethics
  • Ethology

CONCLUSION

I believe, that if you are starting to study one of these topics, which you are interested, or fits the most to you, it will gradually increase your success in wildlife photography! If your budget allows(keep in mind there are also free courses available), and your time, I encourage you to start one!

I hope I could help with this article! Let’s study! Enjoy!

If you have some spare time, please check out my Youtube Channel: https://www.youtube.com/channel/UC6Vgiw_7TZrN7Lx2cFLA5eQ?view_as=subscriber

If you have some spare time, please check out my Instagram: https://www.instagram.com/wildlifeoftheplanetmpc/?hl=hu

Thank you!

The history of wildlife photography

As you might already noticed, this website is dealing with wildlife photography. It would make sense, if we would talk about the beginning of this beautiful hobby(?), and it’s history as general.

In my opinion, every wildlife photographers should be aware of the history of this aspect of photography, at least briefly!

This is the idea behind this article, i try to share as much information as i can with you regarding this topic!

Let’s start! Enjoy!


INTRODUCTION

Nowadays with the technology we have, we are able to photograph hummingbirds in midair, remote cameras capturing elusive animals like leopards, with the available gear, in the 21st century we can capture moments we could not before! We see this kind of photos every day, and most of the time people who are not familiar with photography can’t imagine the work and dedication behind that kind of photos! And the process was even harder, or challenging back in the days, when wildlife photography started to become a thing!


THE HISTORY

In the early days of photography, it was challenging to capture the moments of wildlife with cameras, mainly because of the slow lenses, and the low sensitivity gear.

The first photos of animals in the history were about pets, or zoo animals. One of the earliest photo were taken from lion cubs at the Bristol zoo in 1854 and in 1864, and photos of the last quagga(was a subspecies of plains zebra that lived in South Africa)  by Frank Hayes.

Wildlife photography became more popular, when faster photography emulsions and quicker shutters came in the 1880s.

With the technology developed, more people started to practice this new hobby(?), like the german Ottomar Anschutz in 1884, the first person photographed wild birds in action. In July 1906, National Geographic published its first wildlife photos. The photos were taken by George Shiras III, a U.S. representative from Pennsylvania. Some of his photos were taken with the first wire-tripped camera traps.


SAFARI AT THE END OF THE 19TH CENTURY

At the end of the 19th century, a photographic safari was often a full-blown expedition, with a team of porters manhandling enormous brass-bound cameras, heavy lenses, sensitised glass plates, plate holders, hefty tripods, a portable darkroom and developing chemicals in glass containers. Not to mention tents, guns (for protection and to provide a supply of fresh meat), cooking pots and a mountain of other gear sufficient to last a year or more.


THE KEARTON BROTHERS, BIRD PHOTOGRPAHY

Brothers Richard and Cherry Kearton were perhaps the best known of the early pioneers. In 1895, inspired by their bird-loving grandfather and amateur-naturalist father, who took them bird watching on the Yorkshire moors, they produced British Birds’ Nests. It was a landmark – the first natural-history title illustrated entirely with photos instead of artwork. The Keartons devised a number of new techniques to obtain their revealing wildlife shots. They would stand on one another’s shoulders, for example, and employ tall tripods to glimpse inside birds’ nests. Although their main innovation was the hide.

The brothers designed a variety of ingenious artificial rocks and tree trunks, erected stone shelters and covered tents with grass and heather. Most famously, the Keartons also built a life-size ‘bullock
to get dose-ups of local birds. Unfortunately, one day Richard became so dizzy after squinting through a small peephole for hours (if s uncertain exactly where the opening was) that he lost his balance and the bogus bovine toppled over. Cherry came to the rescue an hour later, but not before taking a photo of his brother’s predicament – surely one of the funniest images of a wildlife photographer at work.


ACCESSORIES INTRODUCED

Nikon F3

At around the end of the 19th century, Carl Georg Schillings embarked on an ambitious project to create a pictorial record of the wildlife of East Africa wrestled with massive, clumsy telephoto lenses and dabbled in flash photography. He had to mix the magnesium flash powder in a mortar immediately before taking each picture itself a very risky operation. The subsequent explosion sometimes set fire to the hide, or even to his cameras.

The Kodak introduced the first publicly available 35mm film in 1914.

In 1925 Leica publicly introduced the first high quality 35mm camera. The shutter speed range was from 1/20 to 1/500 per second.

In 1991 Kodak releases the first DSLR camera.


LIFE OF ERIC HOSKING

No history would be complete without a mention of one of the true greats: Eric Hosking. His 6o-year career is significant because it marks the start of recognisably modern wildlife photography. Hosking was the first to resort to tower hides, in the 1930s, and to use electronic flash for bird photography, in 1946; he also made a decent living from his photos. One of Hosking’s most momentous decisions was his switch to the 35mm system in 1963. Much smaller, tougher and more user-friendly than anything that had gone before, 35mm cameras heralded a new dawn in wildlife photography. They were highly portable, ideal for capturing action and panning with moving subjects, and when modified could even be taken underwater.


DIGITAL FORMAT, THE NEW ERA

In the 1960s wildlife photographers couldn’t review their photos in the field, and auto-focus and light metering had not yet been developed – all of which resulted in high failure rates.  Film roll would then take weeks to be processed, leaving photographers waiting to see whether their excursion had been a success.

The cost of equipment began to fall in the 1970s, and with travel becoming more accessible, the world of wildlife photography opened up to a greater number of people.

But things were set to change – in the late 1990s and early 2000s, photographers began experimenting with then-new digital photography.  


THE FIRST CAPTURE OF THE BIG WILDEBEEST MIGRATION

By hiding cameras in a protective tortoise shells, Allan and Jo Root were able to capture the big wildebeest migration in 1974 at the first time in the history! They also showed the public this amazing phenomenon in their film!


THE TECHNOLOGY THROUGH CENTURIES

I found a great slide about a brief history of the technology, check it out here!


CONCLUSION

Although wildlife photography as a thing is not older than 200 years, technology developed on a huge scale already, and nowadays every beginner photographer can access all the information about pretty much every topic in terms of wildlife photography. It is a shame, we won’t be able to find a lot of amazing animals already extinct, which were alive at the dawn of the wildlife photography, but fortunately we still have a rich and beautiful wildlife on our planet! Keep them safe, help protect their natural habitat, and than you will be able to capture with their fantastic life moments out there!

Regarding for the future, it is very exciting, what kind of technological innovations or developments we will see, but hopefully we will be enjoying this aspect of photography with the same rich fauna, what we are having today!

I hope i could help with this article, if you were interested in a little history!


If you have some spare time, please check out my Youtube Channel: https://www.youtube.com/channel/UC6Vgiw_7TZrN7Lx2cFLA5eQ?view_as=subscriber

If you have some spare time, please check out my Instagram: https://www.instagram.com/wildlifeoftheplanetmpc/?hl=hu

Thank you!

Wildlife photography in the Yorkshire Wildlife Park!

For sure walking in the woods, searching for signs of a subject animal is a great experience, however there is not always an option to just go out there and spend hours looking for our desired animal! Wildlife parks are great experience from a wildlife photography prospect.

We can practice our skills in a more easy way, also it is family friendly, so till the kids are running around, we can shoot a few images in the park! In my opinion there is nothing wrong taking photos in a wildlife park, it is not reduces the value of a wildlife photography experience. In fact, we can go home at the end of the day, with lots of new photography knowledge, and good experience!


YORKSHIRE WILDLIFE PARK

HOW TO GET THERE?

This wildlife park is located near Doncaster, Yorkshire Wildlife Park is located in the heart of England, close to key travel links such as the A1, M1, M18 and the east coast main line linking London and Edinburgh via Doncaster. If you are using GPS:Enter the post code DN4 6TB. The entrance to the Yorkshire Wildlife Park is new The Post Code DN4 6TB will direct you to the established roads opposite the new entrance. Once you reach the destination please follow the signs directing you to the Yorkshire Wildlife Park Car Park.

You can also reach the park by train, for more info click!

You can reach the park by bus, take the No. 57 bus to Finningley from Stand A4 at the Frenchgate Centre, Doncaster to Branton village. Get off the bus just before the Post Office and the pedestrian access to the Yorkshire Wildlife Park is up Brockholes Lane which is opposite. No access for vehicles this way. From Finningley direction, get off the bus at the Three Horseshoes pub in Branton.


ESSENTIAL INFORMATIONS ABOUT THE PARK

The park is open every day from 10am, with the exception of Christmas Eve and Christmas Day, when we are closed.

Summer Season last admission is 5pm and the park closes at 6pm (Closing times may vary during special events). 

PRICES

SUMMER SEASON: 7th March – 1st November 2020

Ticket typeOnline Advance Admission†Off Peak Season (At the gate)Peak Season (At the gate)
Prices per personOnline Pre-booked PricesSummer Off Peak SeasonPeak Season – School Holidays and Events
Adult£19.00£19.00£19.50
Senior (60+) / Student£17.00£17.00£17.50
Child (age 3-15 years)£16.00£16.00£16.50
Child (age 2 and under)FreeFreeFree
Disabled Adult£13.00£13.00£13.50
Disabled Senior /Student£11.00£11.00£11.50
Disabled Child (age 3-15 years)£10.00£10.00£10.50
Official Carer£6.00£6.00£6.00

No dogs or pets are allowed on site (No dogs can be left in cars). In some areas due to free ranging animals, prams/buggies must be left in the buggy park. YWP reserve the right to change any of the information on this website without notice.


WHAT ANIMAL TO PHOTOGRAPH?

First of all, in the park you will have a chance to capture animals with your camera, which you wouldn’t otherwise, think about polar bears or tigers, their natural habitat is difficult to get to or just purely dangerous! But in the park, it is way more easy!

You will have a chance to take photos of lions, giraffes and many more afican animal, tigers and polar bears as i mentioned, leopard, camels, wallabies, lemurs and so on! With nearly 400 animals and 70 different species of animal, Yorkshire Wildlife Park is a fantastic place to practice wildlife photography!


WILDLIFE PHOTOGRAPHY EXPERIENCE IN YORKSHIRE

Yorkshire Wildlife Park offers sessions for wildlife photographers, at every level. The sessions are 5 hours long, costs 135£ and they are lead buy an expert instructor!

The instructor is Rachel Sinclair. Rachel is a passionate wildlife photographer and animal-lover with experience teaching students from all walks of life. Whether you’re a complete beginner or a keen hobbyist, she’ll show you how to make the most of your equipment while photographing ring-tailed lemurs, lions, tigers, giraffes and more. Over a lively five hours, you’ll cover several of your camera’s key manual settings—including aperture, shutter speed and ISO. You’ll also discuss shot composition and discover the best angles to capture these photogenic (but occasionally camera-shy!) subjects. When the lesson concludes, you’re free to stay on inside the park, before leaving with loads of newfound skills and a memory card-full of photos to share with family and friends.

There is a few requirements to meet:

Minimum Age: 16

Participants will be on their feet for most of the lesson, so a general level of fitness is required. Wheelchair access is available.

To make the most of the experience, participants require a camera lens with an equivalent zoom of at least 300mm. If you don’t own one, a suitable DSLR camera and lens can be hired from the instructors for an additional £35.

You can book your space here! Enjoy!


Wildlife parks are perfect opportunities for study the animals in order to get the best out of your photography, you can observe how they move, what is the best angle to shoot with your camera, and so on!

For beginners it is definitely a recommended way of practice, but even experts can find it useful, just think about that when will you have a chance to capture a polar bear with your camera, only if you will go to the Antarctica and take a wildlife photography trip around there! In my opinion it is a good option with no downside!

There are also special events, where you can click real good images, like feeding, or showing baby animals! I would not miss them!

Hope i could help, even if you are just looking for a program for the family or opportunities to practice your wildlife photography skills!

If you have some spare time, please check out my Youtube Channel: https://www.youtube.com/channel/UC6Vgiw_7TZrN7Lx2cFLA5eQ?view_as=subscriber

If you have some spare time, please check out my Instagram: https://www.instagram.com/wildlifeoftheplanetmpc/?hl=hu

Thank you!

Post-processing in wildlife photography!

Being a wildlife photographer requires a lot of dedication, knowledge and skill, and it is not ends when you captured your desired subject animal. At least for the people who want to get the best out of their images. Yes, i am talking about post-processing here! Opening up Lightroom or Photoshop can be pretty daunting for those who aren’t tech-savvy or seasoned post production veterans.

However, like everything else, with practice we an get better in it, pretty quick! I try to help as much as i can in this article, share some ideas, and some Do’s and Dont’s! Let’s start!


CHOOSING THE SOFTWARE

The two big names for this is Lightroom and Photoshop as i mentioned before! Adobe Lightroom is 9.99 US Dollar per month, and Photoshop is currently 19.97 US Dollar per month!

There are a few free options out there, GIMP is one of the most popular, but Darktable, Picktorial ( for Mac users), Ashampoo Photo Optimizer, Photoscape, or Canva.

On the long run, obviously subscribing for Lightroom or Photoshop would be the best option, as the options and tools of these software are just different level, than the free alternate ones! But for beginners, or hobby photographers i recommend any of these free ones to start with, get to know them, so you can become more familiar with post-processing!

There are many tutorial videos on Youtube from beginner to expert level, i encourage you to watch them, if you haven’t opened a post-processing software before!


WHAT IS POST-PROCESSING?

Post processing is process of editing the data captured by camera while taking the photo to enhance the image! This process includes the steps to take to finalise our photos, and get the desired result! We will look at these steps now! I think every photographers have their own method, i encourage you to try out, what works for you, however there are certain steps you should not skip!

Just a little not here, before we start, that if you shoot with your camera with JPEG files, the camera will process your image within the camera, which can be ugly and inappropriate. Try to capture your subject animal in RAW file format, with this option you will make sure your image is not processed by your camera! Just the pure image!

So let’s see!


CROPPING

Okay, so we opened our software, and our image! Obviously when we out there in the wild, try to find the best composition set up possible, but it won’t happen all the time, that is why we need to use cropping as a tool. With this step, you will basically cut down the parts of the photo, which is not necessary for the image! Simple step, but can be really important in order to get a great composition!


LENS CORRECTIONS

This step will require a bit more experience, but don’t worry, after a few photo, you will be comfortable to do it! If you are using Lightroom, there is an option for you, called Lens Correction. Select Enable Profile Corrections and you should see the brand and model of your lens pop up underneath. This step is basically will remove any distortion caused by your lens, and it’s sort of flatten the image for you! For other software, look for distortion and vignetting options!


EXPOSURE ADJUSTMENTS

In order to having a great exposure it’s essential to know how to handle and set up our gear for a photo, you can work on it in the post-processing method, but you can’t make a “bad” image good, just by adjusting the exposure in the software! Important note here, is that you should use a properly calibrated monitor for the process, otherwise your image will end up being underexposed or overexposed. With this step, you will find yourself playing with highlights and shadows, which is a big part of wildlife photography! Feel free to experiment with them during the process!


WHITE BALANCE

Adjusting the white balance on JPEG images are not really recommended, it can degrade the quality of your image. Using this step for RAW format in contrast with JPEG can have a really good effect on our final image! A great way to sort your white balance is to use the dropper tool. If you use it to select an area in the photo that should be perfectly white, it’ll adjust the temperature and tint sliders to reflect a proper white balance. You can fine-tune this of course, but it’s definitely a good starting point.


MAKE YOUR IMAGE COLOURFUL

This step is really important, RAW files always look washed out, so to bring back the colour you need to harness the power of the Vibrance and Saturation sliders. Always start with adjusting the vibrance. It pulls out and enhances the colours that are already there. The saturation slider should only be used if you need to, effectively, introduce more colour into the image. It’s kind of like splashing your photo with a bucket of paint – be really precise and careful! If you pull these sliders too high, you’ll burn out the colours.


MY FAVOURITE STEP: SHARPNESS AND NOISE

It’s always good to give your photos a little sharpen, and reduce any apparent digital noise. It’s important not to go overboard, although that could be said for any stage of your post processing workflow. Sharpening increases the contrast between edges in an image, and too much of it makes a photo almost look like it has been neatly outlined all over wherever there is detail. Just imagine the feathers on a bird photo!

So sharpening is the next step, what we will have, and it will be a bit more advanced, but still don’t worry, after a few attempts, you will start to getting better! I promise!

The sliders you want to pay attention to mostly are the Amount and Masking ones. This is with regards to sharpening, so the highlighted Luminance slider is for noise reduction. The amount will give you the biggest change, so be careful with it, otherwise your image will be very weird. Experiment with it, and you will find out what works best for you!

The Masking slider allows you to limit which parts of the photo receive sharpening. If you hold down the Alt key on your keyboard whilst you pull the slider(in Lightroom), the image will turn all strange and the white areas will highlight what is being sharpened. This means you can avoid sharpening areas without detail, such as the background, and introduce unnecessary noise.

The other main step here is noise reduction. Probably everybody have seen images with grainy details, that’s digital noise. We want to get rid of this. Make sure to do your sharpening first though. If you have a luminance slider, that will do the job for you! If you have an option, try to turn your photo to black and white temporarily it will allow you to see the noise much better – and make sure to zoom in to 100% as well, that way you’ll get a better representation of what’s going on. Pulling up the luminance slider, you’ll see the noise disappear. Pull it up all the way and it’ll make the entire image really smooth, eliminating all the noise. But you’ll do this at the expense of sharpness. Instead, go for a balance.


This is a relatively simple post-processing method, but with some cardinal steps, the rest, well, feel free to experiment, and again, find out what works for you better!


DO’S AND DONT’S

Don’t crop tightly, if you like me in the beginning you won’t be able to resist crop your image tight at first. But, you will have to be very careful there, because if you crop your image really tight, you won’t leave enough room for the subject to breathe within the frame, and you will simple ruin the image at your first step!

Careful with the sharpening. Obviously everyone wants the sharpest image possible! However, the sharpening slider can tempt you to go too far, and the results are ugly, and easily noticed. Don’t take the sharpening slider higher than around 60.

Just like sharpening, you can overdo it with noise reduction too. It almost gives your photos a waxy texture, removing all detail and flattening edges that make something appear sharp. 

Saturation can be the biggest enemy of your photos. It can make colours appear very ‘hot’ in your photo, whilst also making images cease to appear natural. 

Well, the next one is a bit of a grey area, however for me it’s a clearly don’t. You should not  add, remove, or manipulate individual elements of the photo. In general, your edits should affect the image as a whole, rather than specific details. 


Here is a few recommended video for post-processing:

Process using Lightroom, bird photography

A full step by step process

One of a photographer’s process i follow on Youtube


Remember that too much is too bad. Post-processing should be done to just bring back enough details, brightness, contrast, colors, and sharpness in the image. Keep it as realistic as possible. A little bit of punch is acceptable but don’t go overboard.

I hope i could help with this article! Feel free to experiment, but keep in mind the dont’s!

If you have some spare time, please check out my Youtube Channel: https://www.youtube.com/channel/UC6Vgiw_7TZrN7Lx2cFLA5eQ?view_as=subscriber

If you have some spare time, please check out my Instagram: https://www.instagram.com/wildlifeoftheplanetmpc/?hl=hu

Thank you!

Everything you need to know about camera traps!

WHAT ARE CAMERA TRAPS?

A camera trap is a remotely activated camera that is equipped with a motion sensor or an infrared sensor, or uses a light beam as a trigger. Camera trapping is a method for capturing wild animals on film when researchers are not present, and has been used in ecological research for decades.

Wildlife photographers and researchers using camera traps for different reason, however animals are benefiting from this method, because camera traps can capture the subject animal with a very little human interference.

The great advantage of camera traps is that they can record very accurate data without disturbing the photographed animal. These data are superior to human observations because they can be reviewed by other researchers. On the other hand, for wildlife photographers, it can be an option to capture animals, that they would not be able to otherwise, like a polar bear in it’s natural habitat, or a leopard close-up!


HOW ARE CAMERA TRAPS WORKING?

A camera trap’s two main components are a camera to capture images and a trigger to set off the camera.

A camera trap’s capture of a still image or video is triggered by a passive infrared detector that responds when something hotter or colder than the background moves in its detection zone. There are two main components in a PIR sensor; the Fresnel lens and the pyroelectric sensor. The Fresnel lens focuses incoming electromagnetic radiation onto the pyroelectric sensor which then triggers the camera to capture an image or to start recording.

Target detection is camera traps’ weak point, and they need to be set up so that animals move across their detection zone rather than towards or away from the camera. Short trigger and recovery times are preferred.

After dark, camera traps illuminate the subject with infrared light that is difficult for animals to see, or white light if colour images are required. During the day, stills and video are captured in colour, and at night in monochrome under infrared, or in colour with white illumination. Where cameras need to be sited depends on study design. Camera performance is sensitive to the height and angle that they are mounted at; maximum detections come from cameras just below the target’s shoulder height, aimed horizontally. To avoid large numbers of false triggers, trim vegetation in the detection zone that might be moved by the wind. Keep cameras clean and change batteries frequently.


HOW DO YOU SET UP A CAMERA TRAP?

Before setting up a trap you have to find the best spot. Once we know roughly where we are going to put the camera we look for the best tree, or pair of trees in some cases, to attach the traps. We look for game trails, small creeks, ridges and other places where we think we have the best chance of getting a photo.

The camera trap system is basically just a medium-sized black waterproof box, with a ‘heat in motion’ sensor and camera inside. When something warm (like a mammal) crosses the beam, it takes a photo – so the box needs to be close to the ground. The “dry” box ensures that the camera, sensors and film stay dry – and in an area that gets up to 18 feet of rain per year – this is very important. Then we attach the trap to the base of a tree (1-2 feet off the ground) using a piece of webbing (like a belt), and lock it on with a cable lock. We use a laser beam to aim the trap across where we want the animals to trigger the camera. Finally we take one photo to make sure it works then leave it for a few weeks.

USEFUL INFORMATIONS ABOUT CAMERA TRAPS

Camera traps are becoming incredibly fashionable, and it opens up a whole new unseen world to wildlife photographers. In fact, I’d go as far as to say that camera trapping is extremely addictive. The entire process, from setting up your DSLR camera trap to checking it weeks later for the results, has a real thrill about it.

When you found your location, study the lightning in the area, where the sun comes from, and also try to find the best settings for your camera trap!

Camera trapping is all about predicting where your subject might be, and “forcing” them into the composition of your image. Walking through a forest, for example, will allow you to spot “runs” in the grass. This tends to be a thin line of compressed blades of grass, showing you the regular path followed by an animal.

It can be very, very tempting to continually check your camera trap. But every time you visit the trap, you’ll be contaminating it with your scent and disturbing the area in general. Instead, leave it be for as long as possible. Work out how long the battery will last, and resist the temptation to keep checking your setup.


HOW MUCH DOES IT COST TO SET UP A CAMERA TRAP?

Camera traps consist of either a digital or 35mm film camera, usually the small ‘point-and-shoot’ variety, a housing to hold the camera, and an infrared sensor. The trap is usually set up along a path known to be used by animals, with the infrared sensor and its receiver shooting across the path. When an animal (or human!) passes through the infrared beam a photo is taken. Depending on the type of camera (digital or film) camera traps typically cost between $400-$700 USD.


IS MY CAMERA TRAP EFFECTED BY WHEATHER?

Humidity has a highly negative effect on camera traps and can result in camera malfunction. This can be problematic since the malfunction is often not immediately discovered, so a large portion of research time can be lost. Often a researcher expecting the experiment to be complete will track back to the site, only to discover far less data than expected – or even none at all.


THE BEST CAMERA TRAPS 2020

Victure Wildlife Trap Camera 20MP Low-budget gear, great for beginners!

XINTONGVDDDA Camera Trail Wildlife Camera  Affordable, great value product!

KY Wildlife Camera  One of the most reliable in the market right now!

ZLMI Outdoor Wildlife Camera Trap Still affordable, for experts!

KY Wildlife Camera Wildlife Trail Camera Great value, easy to set up!

Tierlr Outdoor 4G Wildlife Trail Camera Professional high-end camera trap!


Well, i hope i could help, if you are thinking about trying out a camera trap, or you looking for products to buy! One thing is sure, it is really a fun experience having one of these camera traps, i encourage you to try out if you haven’t already yet!

If you have some spare time, please check out my Youtube Channel: https://www.youtube.com/channel/UC6Vgiw_7TZrN7Lx2cFLA5eQ?view_as=subscriber

If you have some spare time, please check out my Youtube Channel: https://www.instagram.com/wildlifeoftheplanetmpc/?hl=hu

Thank you!

How to choose a wildlife photography workshop?

Every wildlife photographer should consider different methods of development. If you want to become a better photographer, you need to work on your skills and knowledge, or just purely gain experience by shooting a lot of photo, and then review them, learn from them. There are loads of method, loads of opportunitiy, even if it’s online or offline!

Workshops are getting the popularity in many industry, photography is no exception. This article will be about workshops and their place in wildlife photography! Let’s start!


WHAT WILDLIFE PHOTOGRAPHY WORKSHOPS ARE?

Wildlife photography workshops are events, where you can learn about different techniques, general knowledge of a subject animal, or photography from a more experienced wildlife photographer. These events are mostly happening locations with hides available, and with a known wildlife.

You can find wildlife photography workshops everywhere in the world. The business is growing, sometimes places are hardly available, and you have to book really early to get a place guaranteed.

Therefore many workshops unfortunately are coming with not good standards, or just not a useful workshop at all, so with everything else, we have to be careful, and choose well.


HOW DO I CHOOSE WILDLIFE PHOTOGRAPHY WORKSHOPS?

Bringing paying clients to a wildlife hide puts pressure on the operator to ensure that the animals “perform”. This can mean that some people may look to unethical means of attracting the star of the show. For example, there are a number of hides available where live baiting is a regular occurrence. This is where a live animal will be provided as a prey item, in a controlled space, for a predator to come and take.

Now, everybody should decide if she/he wants to be a part of this kind of workshops, i am sure i don’t. It’s not natural, not ethical, and it not makes me feel good personally, but it’s up to everybody as i said.

Some photography workshops will work with captive animals, and are a great way for you to hone your skills without “wasting time” waiting for the subject to appear. In the UK, some typical captive wildlife workshops include raptors and dormice (not together!). Some wildlife centres and zoos will also run workshops with their animals.

When choosing a workshop dealing with captive animals, it is a good idea to read reviews before you go. You’ll be able to ascertain whether the animals are treated well, and are not overworked, from the comments of previous visitors.

Again, personally shooting captive animals not gives me the same feeling and satisfaction, that the animals captured in the wild with my camera!

Choosing really carefully your operator, your “tourguide” is essential, it can ruin down or raise up your experience of the workshop! Has the leader been to this particular destination a number of times before? Repeated experience with a location usually increases the likelihood of a successful experience for workshop attendees.

Many workshops and tours are run by individual photographers, rather than large companies. This, combined with the fact that there isn’t much advice handed out to those looking to run tours, means that there are a number of workshops that aren’t properly insured (often due to simple oversight or lack of understanding).

What kind of fitness level is required? Will you be expected to hike a good distance carrying all your heavy camera gear or to disembark small boats onto slippery rocks while carrying gear or trudge through deep snow? These are all considerations that you must know in advance that may not be spelled out in the workshop description. It’s distressing to find out only once you’re there that the physical challenges are too much for you. Moreover, it’s a huge bummer if your inability to keep up with the others limits their enjoyment and experience, too.

All tour and workshop leaders should have the required permits, insurance and medical certifications. This is something you may need to inquire about, especially in regards to the permits, which are particular to locations. National and state parks require commercial permits for photography workshops. They also require that the instructor be certified in CPR and first aid.

Carefully read over the cancellation and refund policies of any prospective workshop. As we all know, professional or health and other personal issues can arise that make something planned well in advance suddenly not possible. Make sure policies are clear, reasonable and acceptable to you. And seriously consider purchasing trip insurance, which can greatly lessen the financial pain of any last-minute cancellation penalties.

I recommend before we book our workshop place, that read some reviews or just read through all the information, and then decide!


RECOMMENDED WORKSHOPS IN THE UK

If you live in the UK, and you like otters, this one will fit you! He’ll give you a rundown of their behaviour and how to track them, before teaching you the art of capturing the charismatic beasties as they frolic in the lochs of Argyll and Bute. Link is here!

From photographing seals on a remote Lincolnshire beach, to deer in the East Midlands, Natures Images offers the chance to attend workshops and holidays taught by professional nature photographers. A number of the holidays focus on birds of prey, including owls in mid-Wales and wintering birds in Scotland. Link is here!

If the beautiful minutiae of the animal world are your thing, sign up to Wild Arena’s butterfly workshop for an introduction to macro photography. Capture some of the 250 species that flit about the Stratford Butterfly Farm and learn to use different lenses to immortalise their delicate colours. This course is suitable for wheelchair users. Alternatively, try your hand at photographing birds of prey or landscape photography. Link is here to book!

Wilderness Scotland is a specialist adventure travel company offering a range of holidays and wilderness experiences, including photography holidays, in some of the most beautiful regions of the Scottish Highlands and Islands. Colin Prior, the foremost landscape photographer in the UK, leads many of their photography holidays. Link to book!

Andy Davies is a professional photographer in Wales, specialising in wildlife and landscape. Snorkel on the waves at the Skomer Marine Conservation Zone, Pembrokeshire. Andy teaches you how to take great photos of everything from jewel-like anemones to inquisitive grey seals and even teaches underwater classes. Link to book!

Ever seen stunning photos of stags rutting against a golden dawn and wished they were your own? Nature’s Lens can’t guarantee the sunshine, but they can teach you everything else about photographing red deer – join a workshop this October as the rut begins. Link to book!

Wildlife workshops are hosted here by external organisations, who provide expert guidance on improving and perfecting your photography. Each workshop has a slightly different emphasis or theme, but all offer superb opportunities to get great wildlife shots and improve your skills. Link to book!


A FEW RECOMMENDED WILDLIFE WORKSHOPS AROUND THE WORLD

Winter bears of Finland

Namibian Deserts and Wildlife

Masai Mara Great Migration Photo Safari

Winter wildlife of Japan

Kenya Wildlife Photography Safari

Papua New Guinea 2020

Falkland Islands Photography Tour 2021


Now, fortunately, there are many really good workshops out there, it is just up to you, witch one we would like to choose! I hope i could help with this article a little to narrow down the options! Enjoy and have fun if you will join one of these workshops in the future!

If you have some spare time, please check out my Youtube Channel:

https://www.youtube.com/channel/UC6Vgiw_7TZrN7Lx2cFLA5eQ?view_as=subscriber

If you have some spare time, please check out my Instagram:

https://www.instagram.com/wildlifeoftheplanetmpc/?hl=hu

Thank you!