Camera settings, part 3: Aperture in wildlife photography

After writing about the importance of ISO and shutter speed, we finally arrived to the third pillar of settings, which is the aperture! With this three article, we should understand the relation of this three settings, and how they are working!
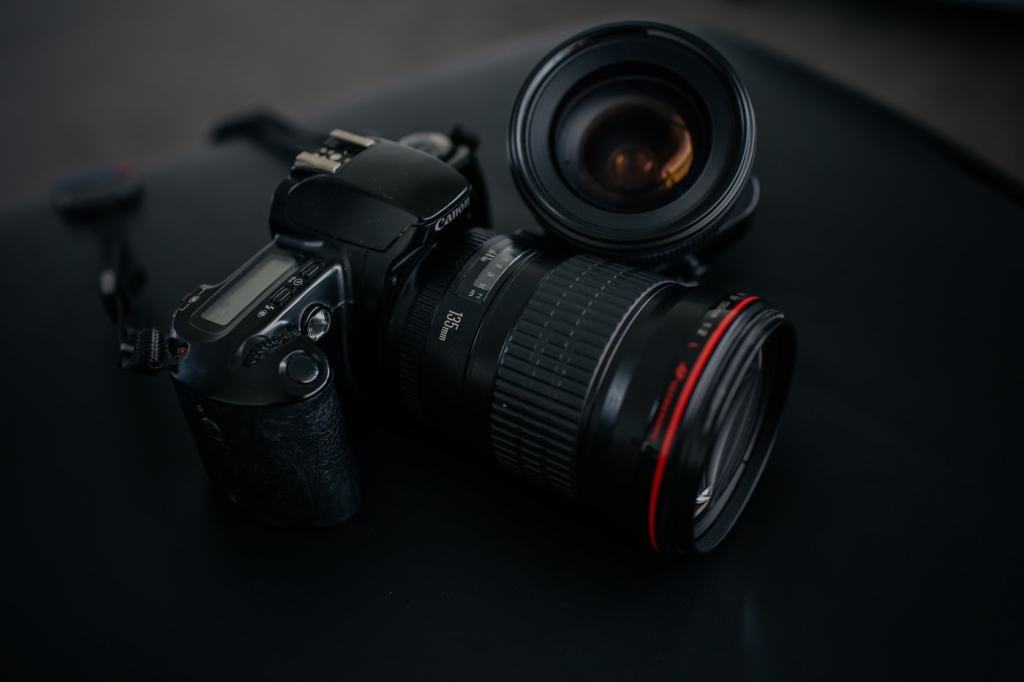
THE RELATION BETWEEN ISO, SHUTTER SPEED AND APERTURE
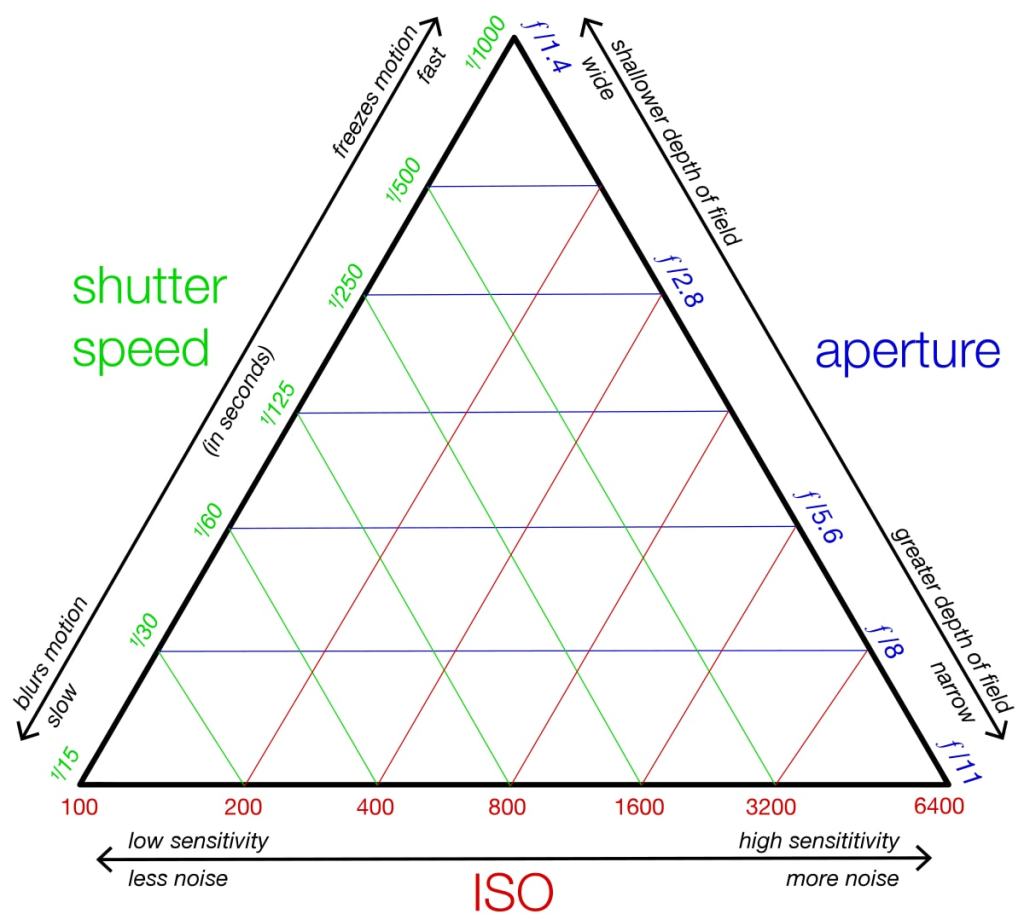
The triangle

WHAT IS APERTURE?

Aperture is the setting, which controls, how much your camera lens is opened or closed. It is either widen the opening or narrow it down, depends on the value of the aperture!

As a result, you will be able to actually control with this that, how much light can enter into your camera. With the Aperture Priority mode on your camera, you can adjust this manually!


THE VALUES OF APERTURE

The value is given with f-numbers, like f/2, f/4 and so on. Between the numbers and the state of the opening has an inverse relation, it means, that as we increase the f-number, the opening will narrow down.

Usually the maximum aperture is f/1.4(widest opening), and the minimum is f/22(smallest opening or most narrow).


WHAT IS THE INFLUENCE OF APERTURE ON YOUR FINAL IMAGE?

A higher aperture(smaller opening) will result a larger depth of field(larger area of focus), till the smaller aperture will result a smaller depth of field.

WHAT IS DEPTH OF FIELD?

To be completely honest, when I studied aperture, it wasn’t that straightforward for me, what is exactly depth of field. In case someone else is struggling with it also, I will try to explain it as simple as I can!

Depth of field refers to the distance between the closest and the farthest objects in a photo that appears acceptably sharp. Generally, a large aperture results in a large amount of foreground and background blur, yielding shallow depth of field. On the other hand, a small aperture results in small amount of foreground and background blur, yielding wide depth of field.


CHOOSING THE “RIGHT” APERTURE FOR WILDLIFE PHOTOGRAPHY

There are a lot of opinions existing regarding the right aperture for wildlife photography, however, like a lot of other things in photography, it can be very subjective. I will try to give some basic guidelines here, but I encourage everybody to practice, and try out what is working for them and what is not.

Now, with fast-moving animals, in order to capture them properly with your camera, generally speaking you will need wider aperture. It can also provide a really diffused background!

What is often missed and overlooked about using a wide aperture though, is the issue of key elements of an animal’s body being out of focus due to the shallow depth of field.

To understand this, I will try to give you an example here. Imagine, we want to photograph a bird, for a portrait. We are focusing on the eyes, which will be really sharp, however the beak will be out of focus. It is because the depth of field is too small, therefore using a smaller aperture in this case would result a better image! With portraits, it is important, that the whole head is sharp, so choose the correct aperture setting carefully knowing this!

Also, keep in mind, that the closer your subject to the camera, the smaller the depth of field will be!

When we are preparing our camera settings, we should start from the widest aperture possible, and adjust from there, if we need for our wildlife photography!


WHEN WE SHOULD USE APERTURE PRIORITY MODE?

Now, generally speaking, the best time using aperture priority mode, if we one, not really familiar with our camera settings yet, or two, we are photographing in a really fast-changing environment, in terms of lighting!

Aperture priority is a good choice, when you are capturing birds flying around with your camera.


COMBINING THE THREE PILLAR SETTINGS TOGETHER

Now, lot of camera is coming with Auto Mode, where the camera will set up the ISO, shutter speed and the aperture automatically. In order to photograph wildlife on a higher level, we should know how to adjust these settings in relation with each other.

Whenever you press your shutter button, the light will enter into your camera, then it goes through the aperture hole. Once the light goes past the lens aperture, it then hits the shutter curtain, which is like a window that is closed at all times, but opens when needed. The shutter then opens in a matter of milliseconds, letting the light hit the camera sensor for a specified amount of time. Now, after this, the sensor gathers the light, and your ISO brightens the image if necessary (it will also result grainy and lower quality images sometimes, so be careful). Then the shutter closes and the light is completely blocked from reaching the camera sensor.

In bright conditions when lots of light can enter in the lens, with a very small lens aperture, we would need more time, i.e. longer shutter speed for the sensor to gather enough light to produce a properly exposed image.

What would happen if the lens aperture/hole was very big? Obviously, a lot more light would hit the sensor, so we would need a much shorter shutter speed for the image to get properly exposed.

These are just a few examples, obviously a lot more scenario exists, this is the beauty of wildlife photography! In nature, with many different environment and animals, we will find ourselves in so many different situations, we should make sure we are prepared and ready!


CONCLUSION

If you read the first and the second part, you should start to see the relations between the settings. With the guidelines I am sharing here and the necessary practice, we should be able to develop with our wildlife photography in a short period of time!

Just knowing this three settings will increase your chances for better images, mastering them is essential in order to become a good wildlife photographer. Obviously, on your journey, you will find your best settings, which works best for you and with you.

Experiment if you would like, feel free to try out different options, with keeping the basic knowledge in mind!

I hope I could help with this article, if you wanted to know more about aperture, or you are new in wildlife photography! Enjoy!

If you have some spare time, please check out my Youtube Channel: https://www.youtube.com/channel/UC6Vgiw_7TZrN7Lx2cFLA5eQ?view_as=subscriber

If you have some spare time, please check out my Instagram: https://www.instagram.com/wildlifeoftheplanetmpc/?hl=hu

Thank you!

What is a telephoto lens? Do we need for wildlife photography?

WHAT IS A TELEPHOTO LENS?

The telephoto lens is a specific type of a long-focus lens in which the physical length of the lens is shorter than the focal length.

LONG-FOCUS LENS

Long-focus lens is a camera lens which has a focal length that is longer than the diagonal measure of the film or sensor that receives its image. It is used to make distant objects appear magnified with magnification increasing as longer focal length lenses are used.

FOCAL LENGTH

The focal length of an optical system is a measure of how strongly the system converges or diverges light; it is the inverse of the system’s optical power. A positive focal length indicates that a system converges light, while a negative focal length indicates that the system diverges light. A system with a shorter focal length bends the rays more sharply, bringing them to a focus in a shorter distance or diverging them more quickly. 


DO I NEED A TELEPHOTO LENS FOR WILDLIFE PHOTOGRAPHY?

To start wildlife photography, no you don’t need a telephoto lens. It is more important to learn the basics, how to handle your camera, settings, the subject animals behaviour, and other attributes. However, if you think about wildlife photography on a more serious level, you will need to start using a telephoto lens after a while.

Most photographers have zoom telephoto lenses in their kit bag, generally of the 70-300mm type or equivalent. These are a great starting point for shooting wildlife, but if you want to get serious about the subject, their relatively short reach can quickly become limiting.


WHY TELEPHOTO LENS HELP IN WILDLIFE PHOTOGRAPHY?

First of all, it will bring your desired animal closer to you, therefore your result can be better. If you develop getting closer to your subject, and using a telephoto lens at the same time, i bet you will start shooting great photos with your camera!

Thinking about distance, we have to mention here the safety. If we want to photograph dangerous animals like lions, bears or even large herbivorous mammals, like the elephant, we have to keep distance to stay safe! You can read more how to capture dangerous animals with your camera here!

Mainly when we are beginners in wildlife photography, and we need a lot of practice, visiting zoo or other animal parks is a great option for it. Now, obviously in these places between you and your subject will be fences, or at least glass windows. If you’re using a lens with a longer focal range, it can be quite easy to eliminate fences from shots. Similar results can be produced on lenses with wider apertures on offer, meaning users with lenses that have smaller focal lengths can still produce mesh-free images. Basically, you need to set a wide aperture, place the lens over one of the gaps and once there’s some distance between your subject and the fence, click the shutter button.


TIPS BEFORE YOU BUY TELEPHOTO LENS

Try to look for lenses with fast auto-focus.

Think about, what would you like to photograph, before you buy one telephoto lens. If you like to capture large mammals with your camera for example, 500 mm lens would be too long, but for bird photography, especially song birds, you can even consider 600 mm. It is up to your subject animal, really.

Obviously price can be a boundary, but NEVER buy a lens because it’s cheap. I would recommend to wait, till you can afford and buy a better telephoto lens!

If you will use your lens hand-held, you probably want to consider buying a light lens. Carrying a heavy lens, and photograph hand-held can be a pretty tiring experience for your arms!

Maximum aperture can be a con, if you are looking for telephoto lenses, try to choose one with a larger maximum aperture.


RECOMMENDED TELEPHOTO LENSES

Now, when I started wildlife photography, I had a really low budget, and my first telephoto lens was a used one. If you are in the same situation, I would recommend to check out KEH Camera, great second hand gears for good prices!

Shop KEH – the world’s largest pre-owned camera store!

AMAZON

If you can afford new gear, you can check out my recommended telephoto lenses here:

My recommended telephoto lenses

My very first lens was a Canon 400 mm f/5.6, I hugely recommend this if you are starting wildlife photography(especially bird photography) and consider buying one. Great lens to start with!


I hope I could help with this article for those, who wanted to know more about telephoto lenses, and thinking about buying one! Choose wisely and have fun with it!

If you have some spare time, please check out my Youtube Chnanel: https://www.youtube.com/channel/UC6Vgiw_7TZrN7Lx2cFLA5eQ?view_as=subscriber

If you have some spare time, please check out my Instagram: https://www.instagram.com/wildlifeoftheplanetmpc/?hl=hu

Thank you!
The history of wildlife photography

As you might already noticed, this website is dealing with wildlife photography. It would make sense, if we would talk about the beginning of this beautiful hobby(?), and it’s history as general.

In my opinion, every wildlife photographers should be aware of the history of this aspect of photography, at least briefly!

This is the idea behind this article, i try to share as much information as i can with you regarding this topic!

Let’s start! Enjoy!


INTRODUCTION

Nowadays with the technology we have, we are able to photograph hummingbirds in midair, remote cameras capturing elusive animals like leopards, with the available gear, in the 21st century we can capture moments we could not before! We see this kind of photos every day, and most of the time people who are not familiar with photography can’t imagine the work and dedication behind that kind of photos! And the process was even harder, or challenging back in the days, when wildlife photography started to become a thing!


THE HISTORY

In the early days of photography, it was challenging to capture the moments of wildlife with cameras, mainly because of the slow lenses, and the low sensitivity gear.

The first photos of animals in the history were about pets, or zoo animals. One of the earliest photo were taken from lion cubs at the Bristol zoo in 1854 and in 1864, and photos of the last quagga(was a subspecies of plains zebra that lived in South Africa)  by Frank Hayes.

Wildlife photography became more popular, when faster photography emulsions and quicker shutters came in the 1880s.

With the technology developed, more people started to practice this new hobby(?), like the german Ottomar Anschutz in 1884, the first person photographed wild birds in action. In July 1906, National Geographic published its first wildlife photos. The photos were taken by George Shiras III, a U.S. representative from Pennsylvania. Some of his photos were taken with the first wire-tripped camera traps.


SAFARI AT THE END OF THE 19TH CENTURY

At the end of the 19th century, a photographic safari was often a full-blown expedition, with a team of porters manhandling enormous brass-bound cameras, heavy lenses, sensitised glass plates, plate holders, hefty tripods, a portable darkroom and developing chemicals in glass containers. Not to mention tents, guns (for protection and to provide a supply of fresh meat), cooking pots and a mountain of other gear sufficient to last a year or more.


THE KEARTON BROTHERS, BIRD PHOTOGRPAHY

Brothers Richard and Cherry Kearton were perhaps the best known of the early pioneers. In 1895, inspired by their bird-loving grandfather and amateur-naturalist father, who took them bird watching on the Yorkshire moors, they produced British Birds’ Nests. It was a landmark – the first natural-history title illustrated entirely with photos instead of artwork. The Keartons devised a number of new techniques to obtain their revealing wildlife shots. They would stand on one another’s shoulders, for example, and employ tall tripods to glimpse inside birds’ nests. Although their main innovation was the hide.

The brothers designed a variety of ingenious artificial rocks and tree trunks, erected stone shelters and covered tents with grass and heather. Most famously, the Keartons also built a life-size ‘bullock
to get dose-ups of local birds. Unfortunately, one day Richard became so dizzy after squinting through a small peephole for hours (if s uncertain exactly where the opening was) that he lost his balance and the bogus bovine toppled over. Cherry came to the rescue an hour later, but not before taking a photo of his brother’s predicament – surely one of the funniest images of a wildlife photographer at work.


ACCESSORIES INTRODUCED

Nikon F3

At around the end of the 19th century, Carl Georg Schillings embarked on an ambitious project to create a pictorial record of the wildlife of East Africa wrestled with massive, clumsy telephoto lenses and dabbled in flash photography. He had to mix the magnesium flash powder in a mortar immediately before taking each picture itself a very risky operation. The subsequent explosion sometimes set fire to the hide, or even to his cameras.

The Kodak introduced the first publicly available 35mm film in 1914.

In 1925 Leica publicly introduced the first high quality 35mm camera. The shutter speed range was from 1/20 to 1/500 per second.

In 1991 Kodak releases the first DSLR camera.


LIFE OF ERIC HOSKING

No history would be complete without a mention of one of the true greats: Eric Hosking. His 6o-year career is significant because it marks the start of recognisably modern wildlife photography. Hosking was the first to resort to tower hides, in the 1930s, and to use electronic flash for bird photography, in 1946; he also made a decent living from his photos. One of Hosking’s most momentous decisions was his switch to the 35mm system in 1963. Much smaller, tougher and more user-friendly than anything that had gone before, 35mm cameras heralded a new dawn in wildlife photography. They were highly portable, ideal for capturing action and panning with moving subjects, and when modified could even be taken underwater.


DIGITAL FORMAT, THE NEW ERA

In the 1960s wildlife photographers couldn’t review their photos in the field, and auto-focus and light metering had not yet been developed – all of which resulted in high failure rates.  Film roll would then take weeks to be processed, leaving photographers waiting to see whether their excursion had been a success.

The cost of equipment began to fall in the 1970s, and with travel becoming more accessible, the world of wildlife photography opened up to a greater number of people.

But things were set to change – in the late 1990s and early 2000s, photographers began experimenting with then-new digital photography.  


THE FIRST CAPTURE OF THE BIG WILDEBEEST MIGRATION

By hiding cameras in a protective tortoise shells, Allan and Jo Root were able to capture the big wildebeest migration in 1974 at the first time in the history! They also showed the public this amazing phenomenon in their film!


THE TECHNOLOGY THROUGH CENTURIES

I found a great slide about a brief history of the technology, check it out here!


CONCLUSION

Although wildlife photography as a thing is not older than 200 years, technology developed on a huge scale already, and nowadays every beginner photographer can access all the information about pretty much every topic in terms of wildlife photography. It is a shame, we won’t be able to find a lot of amazing animals already extinct, which were alive at the dawn of the wildlife photography, but fortunately we still have a rich and beautiful wildlife on our planet! Keep them safe, help protect their natural habitat, and than you will be able to capture with their fantastic life moments out there!

Regarding for the future, it is very exciting, what kind of technological innovations or developments we will see, but hopefully we will be enjoying this aspect of photography with the same rich fauna, what we are having today!

I hope i could help with this article, if you were interested in a little history!


If you have some spare time, please check out my Youtube Channel: https://www.youtube.com/channel/UC6Vgiw_7TZrN7Lx2cFLA5eQ?view_as=subscriber

If you have some spare time, please check out my Instagram: https://www.instagram.com/wildlifeoftheplanetmpc/?hl=hu

Thank you!

Is 400mm enough for bird photography?

I came across with this question at the other day, and i thought i will write down my opinion, because i think many bird photographer are not pretty sure about this, or they are having some concern!

There isn’t a black and white here, however there are a few rules or advice recommended to follow.

I would encourage every photographers who just starts to get into this beautiful hobby(?), that start with studying your subject, how it’s behaving, how you can get close to them, what is the best way to take a photo of them, where you can find them more often. If you know a lot about your subject animal you will be able to get closer to your desired birds, and you automatically will be in a better position to capture a good moment with your camera!

You also have to decide, what kind of photo would you like to shoot, a close up, a full body, or for instance a wide angle image!

Now, speaking about the lenses, there are a few things to consider here! First, if you are using your lens on a crop sensor lens (The term “full frame” or “crop” refers to sensor size. Full frame sensors have the same dimensions as 35mm film or 24mm x 36mm, which is the standard size. Crop sensor refers to any sensor smaller than the 35mm film frame. The common types of crop sensor include APS-C and micro 4/3 systems. Aside from the difference in physical size of the sensor, there are several other differences between a crop sensor and a full frame sensor that you should consider.) you will have a higher chance to be able to staying more distant to your subject animal, because all lenses you are using get multiplied by 1.6 times! It means with a 400 mm, you will end up at 640 mm, which will make your job easier!

Many photographers claim, that 400 mm is considered the minimum acceptable focal length for serious bird photography.


SUMMARISE – Is 400mm enough for bird photography?

Wildlife photography is an art, and the opinions are so diverse, but this is the beauty of it. My opinion is that 400 mm is at least the one you will have to buy, if you are more serious about bird photography, but don’t go out there without knowledge about your subject bird, it is as important as the equipment you are using! You can find a few recommended lens here on my Amazon storefront!

I hope it helps clear the picture a little more around this topic, and you can get useful information from this article!

If you have some spare time, please check out my Youtube Channel: https://www.youtube.com/channel/UC6Vgiw_7TZrN7Lx2cFLA5eQ?view_as=subscriber

If you have some spare time, please check out my Instagram: https://www.instagram.com/wildlifeoftheplanetmpc/?hl=hu

Thank you!

I want to capture a rare capercaillie in Scotland this year!

So i am kind of going crazy for rare animals, and the capercaillie is one of the rarest birds in the UK.

Besides the Red Squirell, this species is on my list also to capture this year with my camera!

What is the Capercaillie and where to find it?

The male capercaillie

A large grouse around the same size as a turkey, the male capercaillie is predominantly black and brown, with a red wattle above its eye, whereas the female has barred brown-grey colouring.

They feed on vegetation and inhabit native pine forests in Scotland.

A mixture of clearings, mature trees and natural forest regeneration is important for sufficient food resources, shelter and open areas where the ‘lek’ (when males attract females and fight rivals) can take place in spring.

I would like to capture one of this rival fighting with my camera!

Capercaillie were extinct in the UK in the 18th century, until Swedish birds were reintroduced to Scotland during the 1830s.

However, the species has now declined rapidly, with an estimated figure of less than 2,000 birds left.

This is due to habitat loss, caused by destruction or overgrazing. In trying to prevent deer overgrazing, fences have been erected but some birds may collide with these, causing death.

With increased understanding, forests can be managed to favour capercaillie, although the threats continue for this UK Red List species.

So my way will lead into the pinewoods of northern Scotland this spring, to the suitable forest habitat in Badenoch and Strathspey!

I hope i will succeed, and if so i will share my experiences here, well, i will share them anyway, but yes! Fingers crossed!

In the meantime, check out my instagram:

https://www.instagram.com/wildlifeoftheplanetmpc/?hl=hu

Thank you!